Re:
The Best Ways to Store Your Bud
Tue, 27/Nov/18
Trying to keep your weed funky fresh? It’s important to consider where you are storing your stash, especially when dealing with larger quantities. Weed is like wine, it can get better with age, and keeping it in the right conditions makes all the difference. There are a plethora of storage containers and accessories on the market, and a number of DIY tips that will help preserve the freshness and taste of your cannabis. Here are some of our favorites methods for stash storage.
Tips for Storing Your Bud
Ditch The Plastic
Plastic bags and containers are some of the worst ways to store your weed for a few reasons. Static from plastic can destroy the little hairs on the flowers, called trichomes, which can lead to cannabinoid degradation, meaning you’ll wind up with less potent flower.
Plastic bags and containers are neither air or light proof, making your bud susceptible to UV light and undesirable temperatures. This exposure can cause your bud to dry out and lose its potency very quickly. You should only use plastic for short-term transportation of weed, and not as a long-term storage system. We recommend using foil or paper instead of plastic if you’re in a storage pinch.
Maintain Ideal Temperatures
Conditions that are too hot or cold will damage the plant material and result in loss of cannabinoids. Don’t put your weed in the fridge/freezer and avoid storing it in place where the temperature fluctuates. The ideal temperature range for cannabis is 32°F and 68°F.
Control Humidity
The average stoner is more concerned with their weed drying out, but too much moisture can be a problem as well. If your weed is too moist, bacteria and mold can grow on the flowers, ruining your experience and making it potentially dangerous to inhale. It’s best to maintain humidity levels between 59%-63% to avoid degradation from excess moisture or drying. Products like the Bodeva Humidity Pack are great accessories to keep handy for humidity control.
Avoid Extended Light Exposure
UV light is one of the biggest accelerators of cannabinoid degradation. It’s important to store your weed in a cool, dark place where there will be little to no light exposure.
Best Storage Containers for Cannabis
The Classic Mason Jar
If you’re a stoner on a budget, a mason jar is a perfect place to store your bud. Glass is a great material for storing weed, as it does not emit or absorb the smell. It’s important to keep the jar in a cool, dark place to ensure it maintains a temperature between 32°F and 68°F and is not exposed to light to avoid cannabinoid degradation. Humidity is also a factor, so for those that want to be extra careful, we recommend getting a humidity control accessory such as the Herbal Boveda Pack to keep in the jar as well.
Stainless-steel Containers
Stainless-steel containers are more expensive than glass jars, but offer a bit more protection overall. They are made with food-grade materials and have an airtight seal that locks in odor and protects against excess moisture. Stainless-steel containers are also opaque compared to glass, so they safeguard against UV light exposure.
There are a number of stainless-steel products available, ranging from basic tin canisters to larger containers with humidity control additions. We recommend a CVault Cannabis Container if you want a little more from your storage product without spending too much.
Cannabis Humidors
Typically used to store cigars, you can now get humidors made specifically to keep your weed stash from getting moldy or dry. Humidors were originally made from cedar, a very porous wood that absorbs moisture and secretes oils that add to the tobacco flavor. Cannabis humidors are made from more neutral woods such as Mahogany, Cherry or Walnut, which are still very porous but won’t disrupt the natural flavor of the weed. Some humidors also come equipped with a humidifier and hygrometer to further maintain humidity levels.
Cannabis humidors are perfect for a stoner who appreciates the finer things (strains) in life. They are definitely an investment, but their sleek design makes them portable and discrete, and they come in a number of sizes. We recommend checking out Cannador if you’re interested in getting a classy cannabis humidor.
Stash Boxes
Stash boxes are great for a stoner on the move. Cheaper than a humidor, the low-profile, compact container fits all your essential smoking paraphernalia. They come in all shapes and sizes, and some may include additional smoking accessories. They are also smell-proof, discrete, and offer protection from light exposure. Stash boxes help keep all your accessories organized and easy to access. They are not airtight, so we recommend using them for travel or short-term storage.
Silicone Stash Containers
Silicone containers are great for those who enjoy cannabis concentrates. These containers are made of medical-grade silicone and are airtight and odor proof. They are designed to be small and discrete and make using concentrates like wax and oil easy and mess free. Silicone containers are also inexpensive and great for both long and short-term storage.
About Terra
The article is the courtesy of Terra: terracannabis.com
If you’re searching for a place to buy marijuana online, look no further. Terra is Canada’s leading online marijuana dispensary that ships directly to you, no matter where you are in the country. We provide fast and discreet shipping on all of our products. Ordering with us is as simple as signing up for an account, placing your order, and submitting payment via e-transfer.
Check out our wide selection of flower, concentrates, edibles, and vape pens. If you’re having trouble deciding or have questions about any of our marijuana products, hit us up and we’d be happy to lend a hand.
COB LED Light — Illustrated
Sat, 04/Aug/18
The latest technology in LED-lightning is COB, Chip-on-board LED light. Full of benefits, except the price, it fits much better into a smaller growing space: a closet or a tent; it emits narrower beam resulting more light onto area (read: more herbs!!). Economic, powerful, beautiful and expensive.
COB (short from Chip-on-Board), is a LED packaging technology that suggests mounting multiple LED chips directly onto a supporting ceramic surface to form a single module, known as COB LED chip. These multiple LEDs tiny in size, wired and packaged together they appear like a bright solid panel and function as a powerful light source:
Image Source — Chip-On-Board COB LED Module
The SMD comparable to classic LED “replaces” those long leads of each diode (known as the cathode and the anode) shrinking a total light unit in size significantly. And COB replaces the full circuit making it one ‘solid’ piece. COB even more decrease the size of a unit, offering more ‘led-lights’ per area, therefore more light is emitted, more dense, and less loss in power due to integrity of the piece. The surface where they fixed to is now called the ‘substrate’.
COD and SMD illustrated
First of all imagine an old-school LED = Light Emitting Diode. For example ones shown on the image below form a LED-light. This technology is already an ancient history of LED lights:
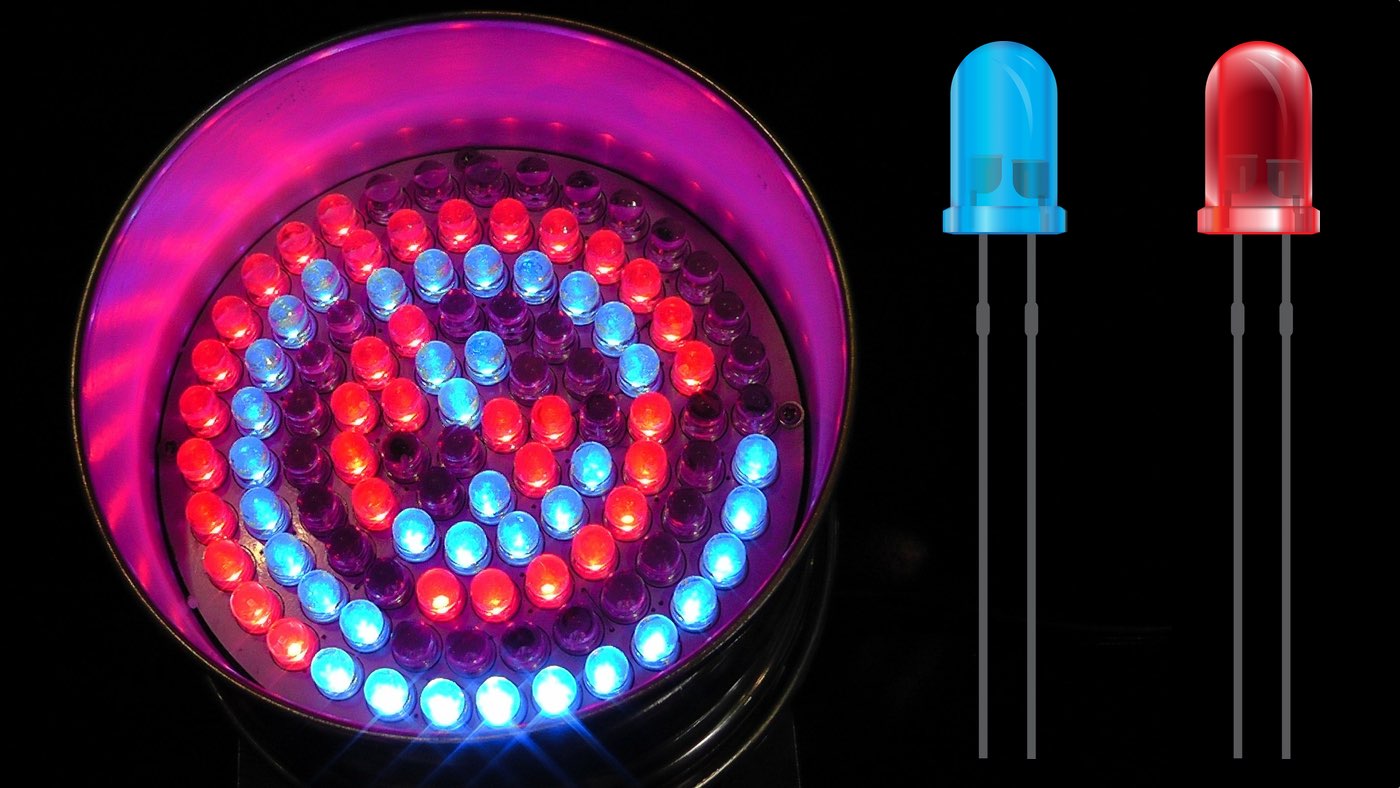
This is a simple traditional LED, already the Past.
Then comes SMD = Surface Mounted Diodes, sometimes referred as Surface-mounted devices… I don’t know which is correct, it appears like both exist. Anyhow, this is the Surface-mount technology, and it suggests when a small ceramic panel consists of a number of small diodes mounted onto this surface/panel one-to-each other very closely. A group of such ‘surfaces’ (the SMD chips) then form a LED-light (see the image below). Comparing to classic old-school LED, this SMD provides higher reliability, smaller size, and a neat and cute look too:
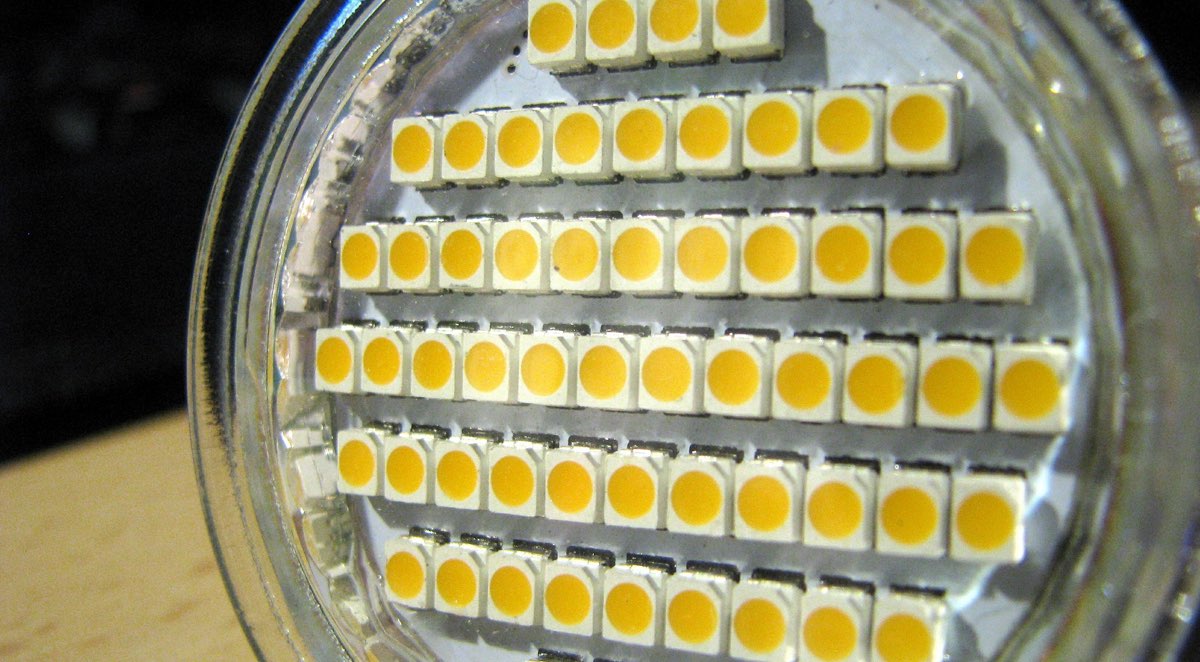
This is SMD LED chips, the most popular LED Light technology nowadays.
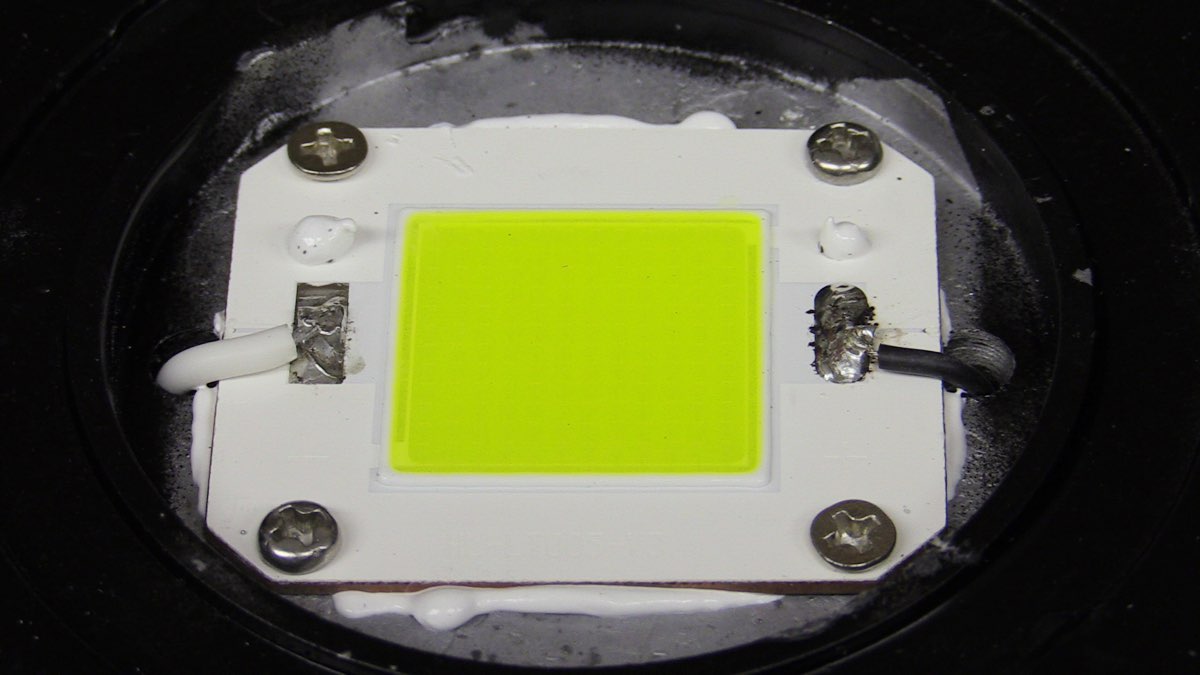
COB = Chip on Board, is the next great step in LED light development, when they place all into one panel (typically 9 or more chips) and it gives more light, significantly less package size, and even greater performance in terms of amount of light. Looks like a small solid panel of light:
— the Chip on board is the growlight latest technology, increasing density of diodes (again) increases the overall efficiency (again), saves space in the green-house and offers more light from the same area
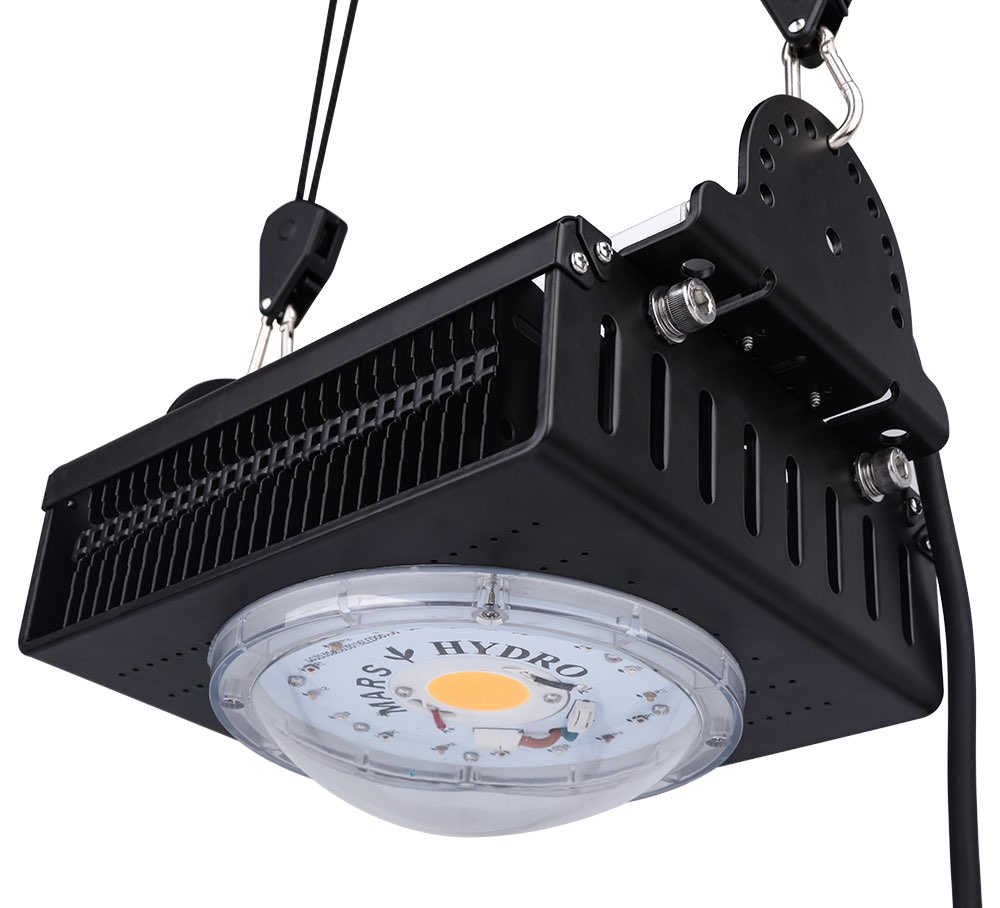
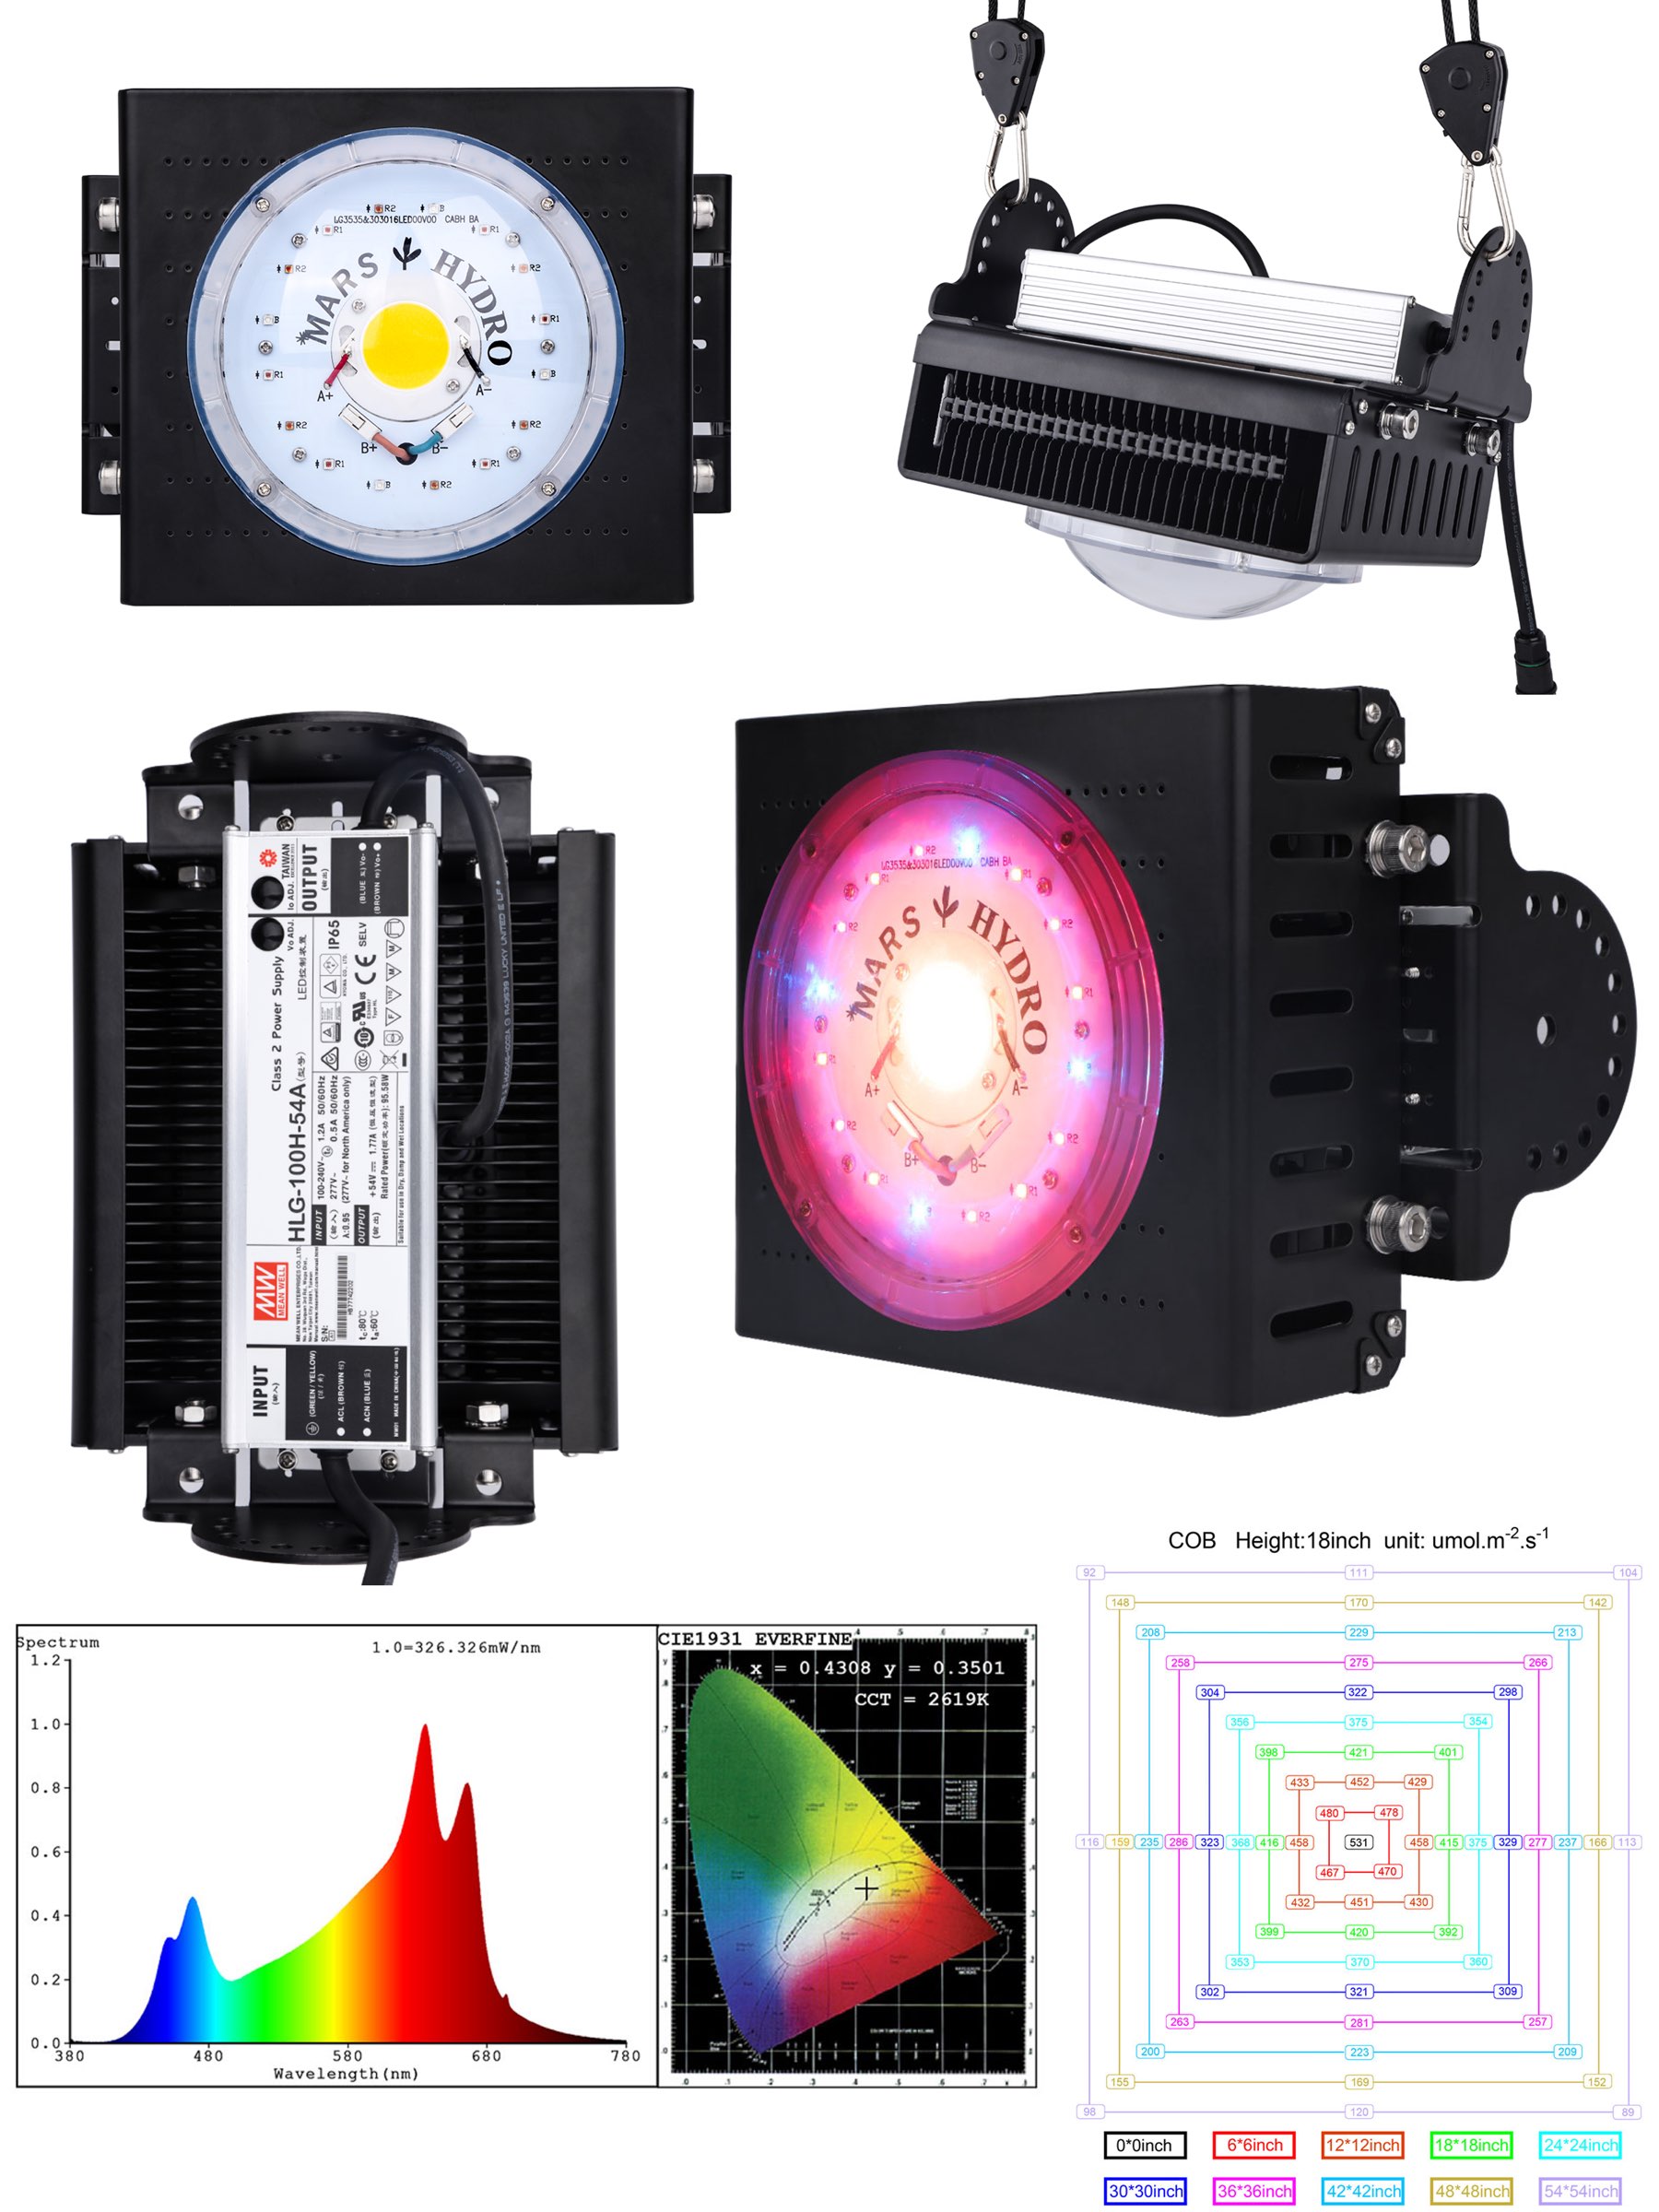
— The COB LED Chip on a COB LED Grow Light! The yellow spot in the middle is the chip, the substrate where to the diodes attached closely to each other altogether to form the LED-light. Fancy, technological, innovative. This is the Mars-hydro’s COB model on the shot above.[/caption]
What else?
The COB LED package appears more like a solid lighting panel rather than multiple individual lights, comparing to the traditional SMD LEDs mounted closely together. See the images above for both.
COD is more expensive in general than a regular SMD. Roughly $300 against $200. This is simply because it is a fancy-new technology, but then think that it’s always worthy to invest into self.
Smaller space required to place COB light unit. No more headache about how to fix an extra electric box of lights over the plants inside your small green-house (whether it is a closet or a grow-tent or whatever indoor growing space). One small COB led-light now shall give you all the same amount of light.
COB led-light is simply convenient, and we at times pay for the convenience too. Think about, that applying to a new technological thing will give an extra knowledge about the technology in general. Isn’t it fun by itself? Some day the COB lights shall finally replace SMDs which are ‘regular’ now, and by that point you already know everything about it in practice. Sounds cool?
No noise. COBs are fanless.
COB LED Grow Light 100w
Mars CX3590 CREE
Fanless No Noise
Read user reviews by this link
- Coverage: 5’x2.5’/ one light ,5’x5’/ 4pcs light
- Max Yield: 2.0g/watt
- Replace HID/MH: 150W
- Draw Power: 110V/110W±5% / 220V/108W±5%
Use of Grow Tents for your indoor weed highest yields
Thu, 05/Apr/18
Grow tents for weed help to keep things easy when you’re growing your cannabis plants indoor, and are the perfect choice for anyone who wants to grow indoor small amounts of marijuana – say 1 to 5 ounces per month. Grow tents for weed are easy to set up and convenient to use, they offer a lot of benefits for anyone who is keen to grow marijuana indoors, or the climate leave no other choice.
Why Need A Grow Tent For Indoor Marijuana Growing?
Grow tents for weed are pretty cheap and are designed especially to facilitate your marijuana growing experience. In contrast, if you try to set up an indoor weed grow space of your own with identical characteristics such as airtight vents, waterproofing, lightproofing and reflective walls, it will probably cost you significantly more than the cost of a good weed grow tent and you will have the extra difficulty of planning and setting up the space yourself: think about isolation good enough to prevent pests still holding a proper climate around your marijuana plants, proper ventilation, light leaks, smell issues – and a whole ton of small unpleasant issues are solved once and for all so simply when people invented a grow tent for weed, heh.
Quick and easy to set up, grow tents for weed only take an hour or a few to put all things together and it can be done by virtually everybody.
Discretion – grow tents for weed prevent light and smells of marijuana buds (flowers) from being released into the surrounding and are discreet enough to tuck away in a corner or closet without attracting unwanted attention.
Perpetual harvesting – weed grow tents (if several) are ideal for having two separate growing spaces to gain your better cultivation practices: i.e. use one grow tent for flowering when the buds appear and the other for the vegetative state – so that you can have a perpetual harvest of world-class pot, isn’t it crazy? Wow.
Easy Way Of Creating A Perfect Growing Environment
Grow tents for weed allow you to recreate nature but in ideal conditions. When you opt for a grow tent, you have many environmental factors taken care of for you.
Grow tents offer a number of environmental benefits including:
![]() You can maximize your LED grow lights thanks to the reflective walls.
You can maximize your LED grow lights thanks to the reflective walls.
Read more: A Guide To Using LED Lights For Growing Medical Marijuana
![]() Grow tents have been specially designed for weed and to accommodate all of the most common grow equipment. LED Grow lights can easily be hung and adjusted, a fan can easily be hooked up and there are vents and ports already provided for extra convenience.
Grow tents have been specially designed for weed and to accommodate all of the most common grow equipment. LED Grow lights can easily be hung and adjusted, a fan can easily be hooked up and there are vents and ports already provided for extra convenience.
![]() Grow tents have been constructed to stop leakage of light either out of or into the tent. This helps plants to produce maximum numbers of bulbs while also helping to make your growing stealthy.
Grow tents have been constructed to stop leakage of light either out of or into the tent. This helps plants to produce maximum numbers of bulbs while also helping to make your growing stealthy.
![]() As grow tents are easy to clean and are waterproof, spills will be kept from damaging the floor and its floors and walls can easily be wiped down for low maintenance.
As grow tents are easy to clean and are waterproof, spills will be kept from damaging the floor and its floors and walls can easily be wiped down for low maintenance.
![]() As grow tents for weed are sealed and equipped with inbuilt air ports and vents, it’s easy to install a fan and achieve optimal airflow. This will ensure that your cannabis plants get enough carbon dioxide — a.k.a. CO2 — and that heat buildup won’t be a problem.
As grow tents for weed are sealed and equipped with inbuilt air ports and vents, it’s easy to install a fan and achieve optimal airflow. This will ensure that your cannabis plants get enough carbon dioxide — a.k.a. CO2 — and that heat buildup won’t be a problem.
![]() Odour won’t be a problem when you use a grow tents for weed crops indoor since you can use a carbon filter. As negative air pressure is generated in the sealed space, so long as a fan is on, the doors are closed and the carbon filter is in place, no smells can leak into your home.
Odour won’t be a problem when you use a grow tents for weed crops indoor since you can use a carbon filter. As negative air pressure is generated in the sealed space, so long as a fan is on, the doors are closed and the carbon filter is in place, no smells can leak into your home.
Choosing The Right Size Indoor Tent
There are many different grow tent models available for weed growing in a range of sizes and it can sometimes be tricky to know which is the right one for you.
The best size for an indoor hobbyist is probably either a 2′ x 4′ (61 cm x 122 cm, floor area) or a 4′ x 4′ (122 cm x 122 cm, floor area). These are designed to accommodate the most popular LED grow lights. New growers will have plenty of room to grow a decent size yield but it won’t be so large that it’s overwhelming. You will be able to obtain convenient access to all of the plants, even those right at the back, however you will still be able to use a full sized grow light. If you would like to grow a larger yield, a 4′ x 4′ tent can accommodate the largest grow lights and it also has more height without being so large that it is unmanageable. Practically a tent with a bigger floor area is taller, but not always.
Height is important, with a minimum of 5 feet (152 cm) being essential and 7 feet (213 cm) being a better choice. This is because you won’t want your plant to grow into the light and accidentally get burned. If you have more height, you can use a more powerful light and therefore grow TALLER PLANTS with LARGER BUDS.
What To Look Out For
While you may be tempted to opt for an expensive all singing, all dancing grow tent, but the cheaper grow tents for weed are often just as good with almost all of the features that you’d find in the most expensive models.
2′ x 4′ x 5′ tents – A Little Short
61 cm x 122 cm x 152 cm (where 152 is height)
These 2′ x 4′ x 5′ tents are a little short, so unless you lack the space in your home for a taller model, this size is not ideal. If you need to go for this size, you will need to ensure that you watch how high your plants are growing.
4′ x 4′ x 7′ tents – Supporting Larger Grow
122 cm x 122 cm x 213 cm (where 213 is height)
These 4′ x 4′ x 7′ tents for weed are ideal for supporting larger grow lights and will give you plenty of height to accommodate taller plants and LED lights: more powerful for better yields, placing them high enough not to burn the leaves.
Read more: A Guide To Using LED Lights For Growing Medical Marijuana
Which Are The Best Grow Tents For Your Weed?
1. Width and height define number of cannabis plants, how many you can put onto the grow tent’s floor.
2. Height is responsible for better yields, healthier plants, more potent lights to use.
Once you have decided on the right grow tent for weed to meet your needs, you need to decide on which manufacturer’s product you would prefer to use. Here are some excellent models that come in a range of sizes to suit different setups.
OSHION 4′ x 2′ x 5′ Grow Tent For Weed
122 cm x 111 cm x 152 cm
This small, reliable grow tent is small enough to fit in compact spaces. It boasts excellent light efficiency with 600D material which is heavy duty and will ensure fast and better plant growth. Quick and easy to assemble in just 20 minutes, it is still incredibly sturdy and durable and as it looks like a zip up wardrobe, it is very discreet as well as being simple to clean thanks to a removable spill tray.
APOLLO HortiCulture 36” x 36” x 72”
91 cm x 91 cm x 183 cm
This small grow tent is ideal for just a few plants but as it is completely lightproof and features a 100% reflective mylar lining, it ensures that plants will grow strong and quickly. Super quick and easy to assemble this is a sturdy and durable tent which is also pest-proof and able to keep an optimal room temperature.
Ipower 48” x 24” x 60”
122 cm 61 cm x 152 cm
This medium sized grow tent offers more room to grow more cannabis plants and is a simple to clean, low maintenance option thanks to a removable floor tray. 100% light proof, its quality reflective surface maximizes your grow light’s potential and as it repels pests and keeps an optimal room temperature, you will enjoy perfect growing conditions. Sturdy and odor-proof, it also boasts excellent ventilation.
Ipyramid 48” x 48” x 78”
122 cm x 122 cm x 193 cm
This mid-sized grow tent is affordable yet high quality, and is sturdy and durable. Allowing for precise control of humidity, light intensity and temperature, it also has mesh windows so you can check on your plants without opening the tent.
VIVOSUN HortiCulture 60” x 60” x 80”
152 cm x 152 cm x 203 cm
This large model is tear proof and heavy duty as well as being fully lightproof. It is also simple to install, despite its larger size and as it is very sturdy, it allows for fast and healthy plant growth.
VIVOSUN 96” x 48” x 80”
244 cm x 122 cm x 203 cm
The extremely large grow tent is only suited to very large spaces but is surprisingly simple to install, even for someone who has never installed a grow tent before. Durable and strong, it is made from quality materials and it boasts dual ventilation docks. This is a solid, long lasting tent that will keep light firmly inside and temperatures at the optimal level for good quality plants.
GORILLA GGT59 5′ x 9′ x 6’11”
152 cm x 274 x 211 cm
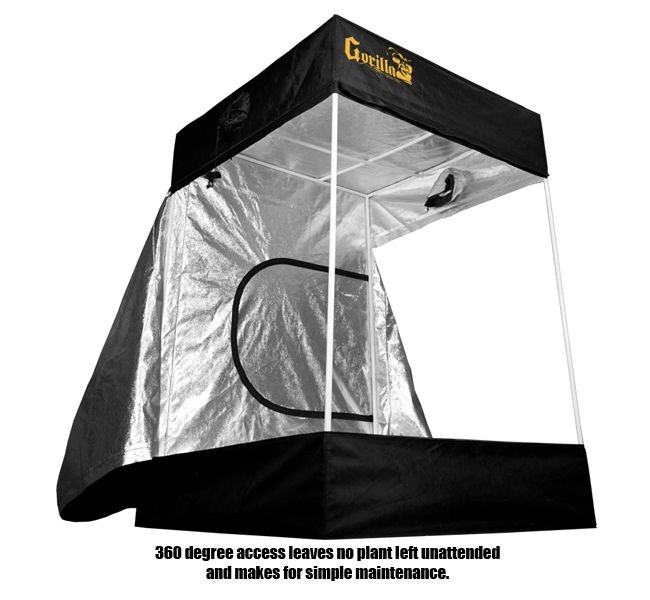
For the best possible quality, Gorilla grow tents are top of the range and come in a wide range of sizes. Made from 100% metal interlocking as well as heavy duty materials, this is a durable and sturdy tent that can be up to 7’11” in height to accommodate the tallest plants and thanks to its diamond reflection technology, your plants will get sufficient light. While this is an expensive model, it is perfect for serious growers as it can grow a lot of plants and can take a weight of up to 300lbs for plenty of grow lights.
How To Set Up Your Grow Tents For Weed
When setting up your grow tent, you’ll need :
A grow tent, A grow light, A carbon filter.
1. Before you begin setting up your grow tent, you need to make sure you have the time and space to dedicate to the project. Clean up the area where you plan to build the tent and then do the construction in the place where you plan to keep it.
2. Hang your grow light using a rope ratchet as this will allow you to adjust the lights whenever necessary without accidentally dropping them on the plants. Ensure that the rope you choose to secure the lights can handle the weight.
3. Hang your exhaust fan in the tent as this will muffle the noise it makes while running and ensures that there is a straight path from the light to the fan for the best possible airflow and circulation.
4. Ensure you have a way of allowing fresh air into the tent. Usually, grow tents will have a removable vent at the bottom. The best way to get a good airflow without risking light leakage is to create a small light trap by facing down the intake vent enough to allow air through but no light.
5. Connect the carbon filter to remove any telltale odors. Hang it with a rope ratchet so it can easily be adjusted. You will need an airtight line between the fan and the carbon filter to make sure no smells escape. You will probably want the filter to be hung towards the rear of the tent so it won’t get in your way. So long as the fan is running and the tent stays shut, there should be no smells escaping into your property.
6. Now your tent is all set up, all you need to do is double check all of the components before you add your plants. Run a sound check to make sure your fans aren’t too noisy. Their sound can be hugely reduced by hanging them instead of allowing them to sit on the floor. By keeping them clean, you will also stop sounds from occurring. Water and air pumps should also be placed on something other than the ground as this will muffle any vibrations which cause excess noise. Next, check that no smells or light are escaping from the grow tent. Turn the light on and run the fan for a day to ensure that everything works as it should. You should see the tent’s sides bowing slightly inwards when the fan is turned on. This will mean that negative air pressure is being created and this stops odors from escaping into your home while the tent remains closed. Also check that you have attached the carbon filter securely to the exhaust fan and no air can leak out or in. Having a strong seal will guarantee that all air leaving the tent will pass through the filter first to remove all smells. Also walk around you home once at each time of day to check for any telltale sounds, smells or lights.
7. Finally, run a safety check. Everything inside your grow tent should be completely secure with all electronic equipment off the ground in case of an accidental water spillage. Ensure no cords are hanging in the tent as this will ensure greater safety too.
8. Now you are ready to add your container with its growing media and seeds in it. All you need to do is to give your plants nutrients and water them regularly and then when they have reached 6 weeks, put the grow lights onto a timer which turns on and off in 12 hour cycles and you buds will begin to grow within one or two weeks.
An indoor grow tent for weed is a practical and convenient way to grow cannabis plants inside your home and is the easiest way to obtain a perfect growing environment for the best quality product.
Cultivating Proper Trichomes
Wed, 16/Aug/17
Many cannabis growers are in love with what they grow. It’s natural to be proud of one’s achievements, especially when their development is dependant on so many factors: light, air, environment, watering, etc. etc. But rather than focusing purely on the size of the cannabis plant and the number of flowers it produces, it pays (literally) to dedicate time to help the plant produce the most rosin, and therefore the most potent trichomes, which it can.
Trichomes
Trichomes are small sugar granule-like crystals made from the rosin the plants excrete to thrive in its environment. Some of the oils repel pests, while others attract pollinating insects. Like various glands in a human body, the glands of a plant (trichomes) contain all chemistry the plant produces, and this includes all terpenes and flavonoids and, of course, cannabinoids. The following growing weed at home tutorial is focused on what you, the home cannabis grower, can do to stimulate rosin production which, in turn, is what forms those sparkly trichomes. When you master the art of cultivating proper trichomes the results will be evident in the lab-testing stage where you will notice higher concentrations of CBD, THC, terpenes, and other desireable cannabinoids.
Males And Females Of Cannabis Plant
There are male and females of the marijuana plant, and it’s only females being producing flowering buds that can later be smoked or turned into an extract. If you start with feminized seeds, all of the seeds you germinate have the potential to produce potent flowers but none feminized seeds will have to be sorted out in the flowering phase: Both males and females will sprout buds, but they will appear different on either plant—females with their long, whitish hairs, and males with hanging “balls.” Remove the boys immediately before they pollinate the females or you won’t get as big a harvest.
And another thing to remember and not to forget:
The Hermaphrodite Alert
Because of sudden changes in the environment of the plant the female plants can become shocked into becoming hermaphroditic if you don’t keep the growing conditions consistent and that’s a big waste of time and energy.
Encouraging trichomes in the flowering phase
Switch the light to 12-hours on and 12-hours off to signal to the plants that it is the “end of summer” and that harvest time is around the corner. Now is the time for them to switch from their vegetative phase to the flowering phase.
Wind
Even something as simple as keeping each cannabis “cola” bathed in good air flow, right to the end of the flowering stage, will help to increase bud size and rosin production. The end stage is the most challenging when it comes to stimulating rosin production and trichome growth. The plants are crowded in their space, vying for light and air and nutrients, but it’s not the time for you to quit and be satisfied with the trichomes that already exist. This is the final stretch, after all! Cannabis is a plant that relies on wind to pollinate, but it also knows when it’s futile to waste energy on buds that won’t be passing on their genetics. The cannabis plant will, therefore, save its energy so that it can put it toward buds that are exposed to a breeze. This is the optimal time to separate plants a little more, give them plenty of space, and kick that airflow into gear without making the room into a wind tunnel. Remember, the more energy a plant expels in the adult growth stage, the more rosin-filled the yields will be.
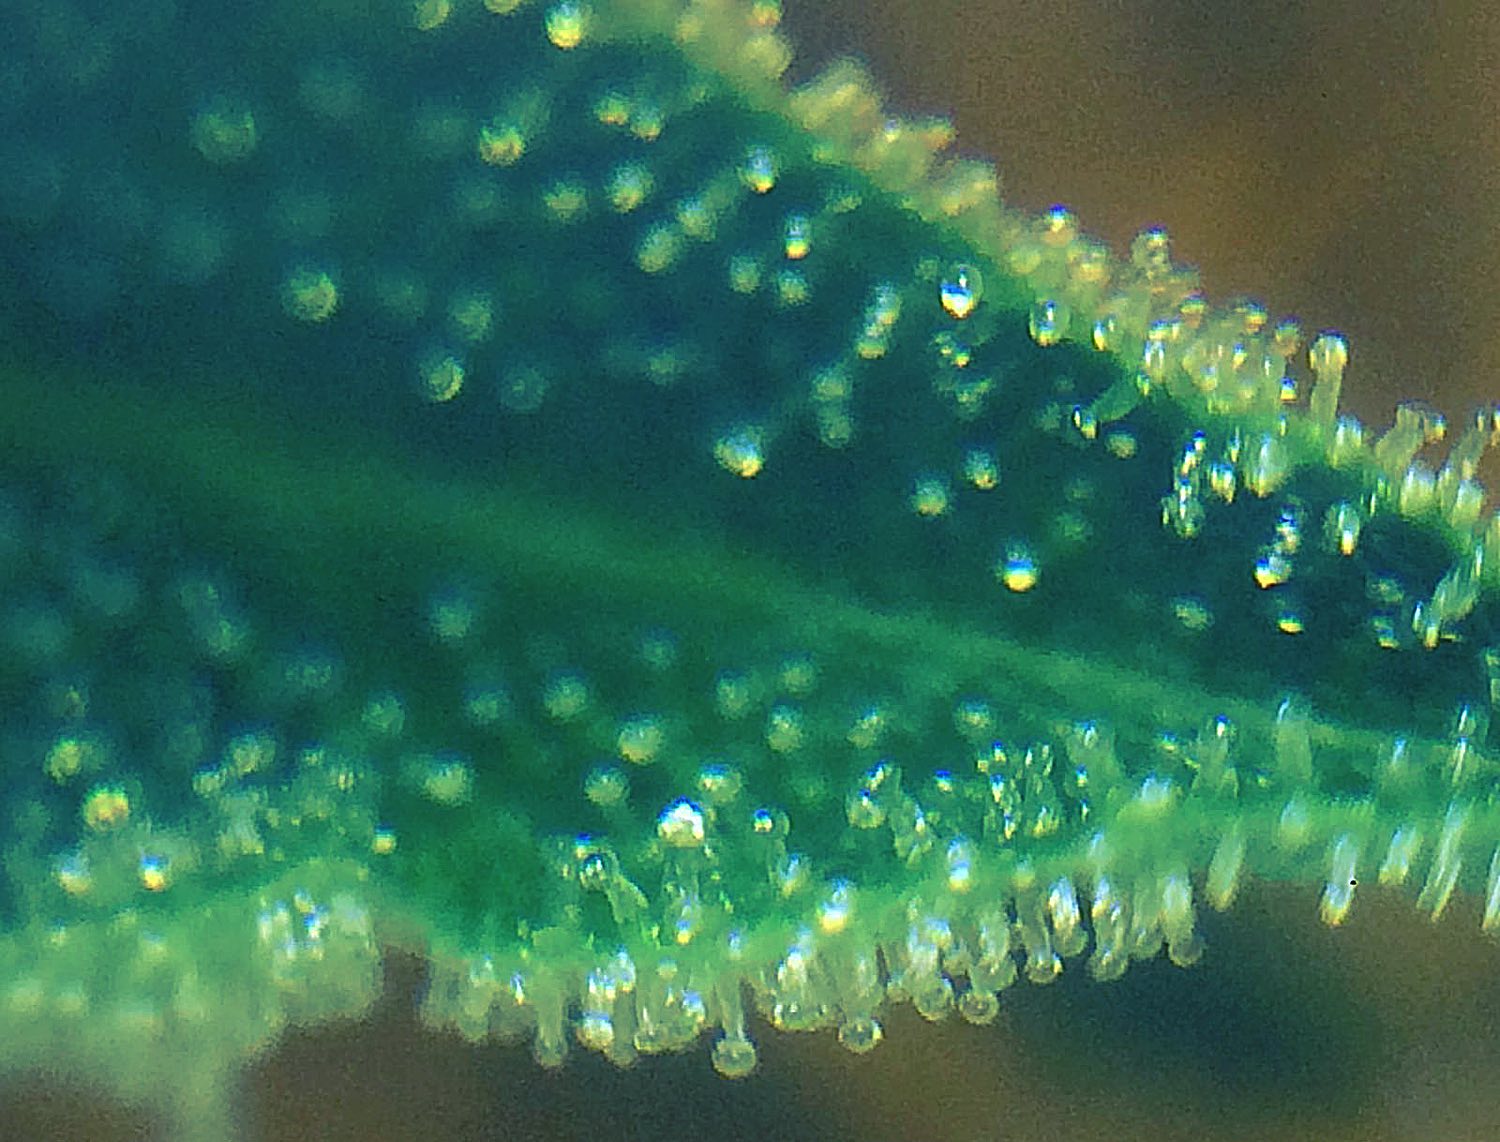
On the image: Transparent Trichomes on a Leaf of Cannabis Plant
Trichomes Matter
Trichomes are small hears (coming from Greek “trichomes” are translated as “hairs”). They are on the epidermis (“skin”) of a plant. Technically they are glands, and plants use them for many chemical purposes: whether it is attacking a prey for a carnivorous plant or a psychedelic message to humanity or maybe only a medical help.
Like various glands in a human body the glands of a plant (trichomes) contain all chemistry the plant produce, and this includes all terpenes and flavonoids and of course THC. A combination of these mentioned contents indeed determines the quality and the properties of marijuana and quality of a cannabis plant. This makes trichomes of cannabis plants to be so important. Same importance as the weight of dry buds.
No trichomes? Don’t freak out
Allow your marijuana plants to have 2-3 months of time to flower to their fullest. Even if they have beautiful big buds, you won’t see full trichome expression on the leaves and buds until the end of the flowering phase. Check with your seed provider for an idea of how long you should wait; each genetic strain is different. You can also tell when the flowering phase is over and the harvest is ripe by observing the white hairs on the flowers turn a red or orange-tinted brown. The buds should be frosted with trichomes and will likely emit a powerful odor.
Preserving trichomes while harvest & trimming
Cut the whole plant just above the soil but avoid touching the sticky buds lest you lose precious trichomes doing so. Use small, sharp scissors to clip the leaves, often called “trim,” away from the buds and toss those leaves away. They are not suitable for smoking, but some people will juice them (resulting in a non-psychoactive, but nutritionally delicious drink). Then, clip the smaller, frosted, leaves that are closer to the bud and use a pollinator to agitate the trichomes off of them; ideal for pressing into hash or extracting with oil or butter for edibles. What’s left is the perfect little bud, just like you see at a dispensary but it’s still too moist to smoke.
Curing cannabis with trichomes in mind
Curing is a slow, tedious process but it will leave you with buds that burst apart between your fingers and burn beautifully. Do not use forced heat to cure your cannabis; leaving the buds in the oven or drying them with a hairdryer will rob it of oils and terpenes, completely ruining the taste and overall effect of the bud.
Simply leave the buds alone in a dark, dry room for about seven days. Move the buds to a glass jar in the same room, returning daily to take the lid off for about 20 minutes each day to release any humidity. When the stems snap quickly but still have some moisture inside, it means the curing process is nearly done. A hygrometer will help monitor RH levels, or Boveda packs will control the RH to the degree you desire. Store cannabis in a UV safe container for another 2–4 months to allow the chemical processes in the weed to slow down completely and for the THC and other cannabinoids to finish developing.