Re:
How to make Hydroponic Marijuana easy guide
Fri, 25/Dec/20
Growing hydroponic marijuana is a reasonable decision as soon as you have space and feel yourself an engineer. Just we do not mean an engineer building space shuttles but an engineer able to connect a water tube to a growing pot! Indeed, a hydroponic marijuana garden is that easy, and we are telling you everything we know about how to construct one at home. Loosely saying, understanding the basics of hydroponics ends with “where from” and “where to” you send the water. Hydroponics is not quantum physics, anyway, you surely make a try if you are passionate enough.
Hydroponic marijuana advantages
When we grow marijuana at home, basically, we want more buds but spend minimal effort on it. The hydroponics is for that, no kidding, the whole marijuana growing business becomes cleaner and easier, and your nugs grow faster and become bigger. A paradise on Earth for stoners? In general, yes, the hydroponic weed method is a great invention, existing since the 1600s, but of course, you pay a small price in cash and effort to make it happen.
The principal advantages of the hydroponics are:
- Bigger potent nugs – the main pro!
- Nutrients result in higher efficiency
- Cleaner growing space
- No rot in roots
- No pests
Once the system is constructed and installed, you only track whether it is functioning well – this is where you set yourself a little bit more busy compared to the regular classic weed growing.
How does the hydroponics work?
The idea of the hydroponic marijuana system is in getting rid of the messy soil business, you use water as a growing medium instead of soil. The nutrients that your marijuana plants require for being healthy and rich with buds you dissolve in that water. Then, the whole hydroponic construction shall aim only to deliver such nutrient water solution to the plant roots. Simple as that.
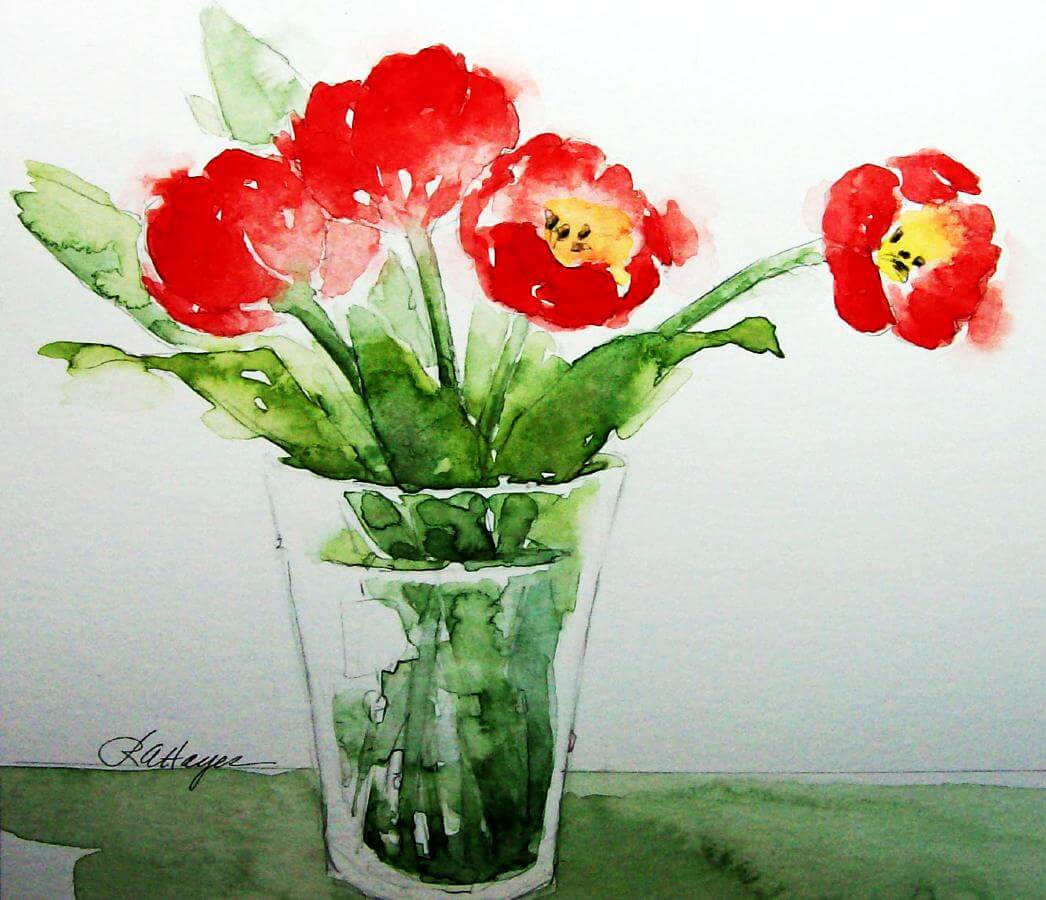
Simplest hydroponics (painting by Roseanne Hayes)
I bet, you experienced the hydroponic system before at least once in your life, when you put, say, Valentine flowers into a jar of water to let them stay fresh longer. And, if you ever applied a grandma’s method of adding a tablespoon of sugar and an aspirin pill into a jar with Valentine flowers, you certainly resulted in those flowers surviving longer – this was your first hydroponic system. In this example, you dissolved nutrients (sugar and aspirin) in water and delivered them along with water up the stem to buds and leaves.
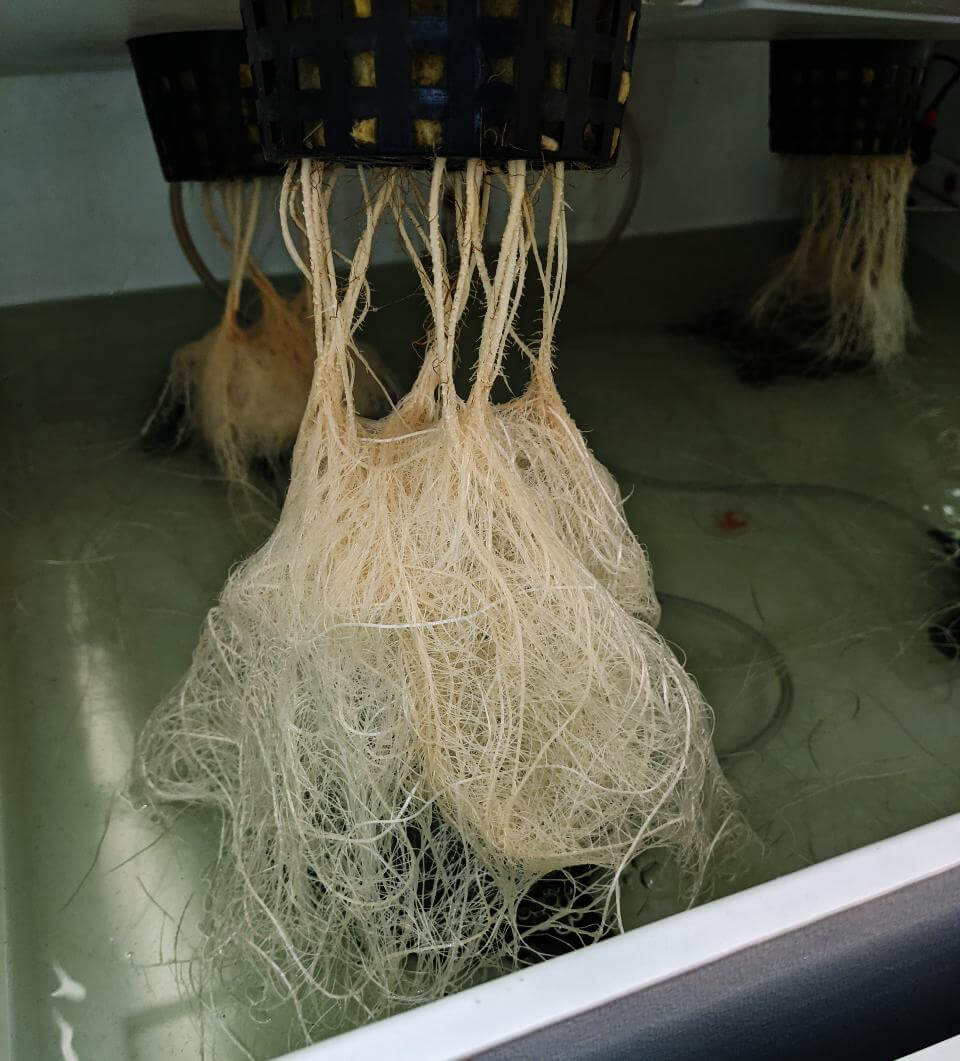
Hydroponic marijuana roots
For a cannabis hydroponic system, we repeat the same idea of delivering nutrients to plants in enormous amounts but more thoughtfully.
How to get started
Pour water with nutrients in it into a pot, where your plant sits, an extremely loose medium, like hydroton clay pebbles, allows water to go through continuously moistening the roots, as you poor the same nutrient water solution again and again. The roots take in nutrients from this moist as water passes by. The “used” water is collected underneath in a tank, but the plants do not take all nutrients in one iteration, so you pump it up again into the pot, repeating the cycle, and measuring the PH.

Ready-made hydroponic costruction
Hydroponic marijuana suggests you grow it indoors, which is the classic way. Going hydroponics you win the relatively sterile environment, and you care not about pests, because there is no soil and no pests. Making hydroponics outdoors is possible too – your fantasy is the only limitation once you understand the idea.
1) You start hydroponic when you already have small plants, what we call seedlings. That practically means your seeds got germinated already, and you let them grow till the first two embryonic leaves are off, that is how you get marijuana seedlings. Having a clone skips this step and you put the clones straight into the hydroponic environment.
We promised you shall touch no soil with the hydroponic marijuana method, so you germinate seeds in a Petri dish and grow them till seedlings in Rockwool. Technically, you can send the germinated seeds right away to the pots with hydroton, but we’d recommend doing so after you experienced getting your first hydroponic harvest.
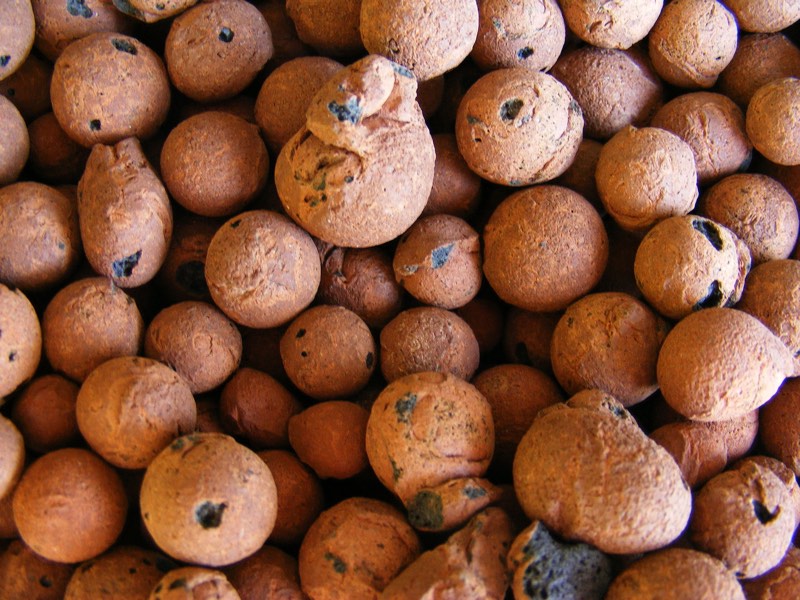
Clay pebbles / Hydroton
2) You need to fix your plants in the pots, but keep roots free to access water and oxygen. Growing medium for hydroponic marijuana is usually coconut coir crushed, clay pebbles aka hydroton, or a mix of the two. Using Rockwool is a popular option too, especially if you mess with clones. Some cannabis enthusiasts have already presented using carbon pieces as the hydroponic growing medium and they report it performs as well as hydroton.
3) Plant your plants into pots filling the space with the growing medium of your choice. You make it as simple as if it is soil, except that it is not soil but coconut coir, pebbles, hydroton, or carbon.
4) Prepare water solution by adding nutrients (provided you got one for the hydroponic weed from the grow shop, or mixed it yourself) into the water.
5) In this step you check the PH of your water solution, which you keep at about 5.5, and you need a PH meter for that. This you do mandatorily. Messing with the hydroponic nutrient solution, you can easily go wrong with the PH. A little more complicated than growing in soil. So you need a PH meter to grow weed hydroponically.
6) Then you put together Step 3 and Step 5 by managing to send the water solution, full of nutrients, through the growing medium in your pots for keeping roots all the time moist. You may need a pump working 24×7 or a scheduled pump with a trigger. A pump with a timer is going to be an extra electronic thingy to the system but you can skip it if you just deep the roots into the tray with the water solution.
Sir Francis Bacon and hydroponics
The hydroponic method works for any terrestrial plant, including marijuana. It got first discovered as a theory and method by Sir Francis Bacon, the 17th-century philosopher and poet, and the legal advisor of Queen Elizabeth I of England, also Lord High Chancellor of England. Alike many noble masterminds of that time he experimented in many fields of knowledge, including hydroponic farming and cultivation of (all) plants.

Sir Francis Bacon
John Woodward continued the research yielding even more discoveries in hydroponic plant growing science.
Then, in 1859–1875, German botanists Julius von Sachs and Wilhelm Knop presented the solid technique of the soil-less cultivation which we know as hydroponics, or hydroponic cultivation. Hydroponic cultivation is wider than indoor marijuana, it extends as far as future farms by NASA on Mars.
Hydroponic marijuana
A well designed construction for making hydroponic marijuana can be a pleasure to grow. With a little investment and creativity you’ll get an automated system giving you faster bigger yields of weed. The whole business will also be cleaner, almost sterile.
How To Dry Marijuana Buds Guide
Wed, 15/Jul/20
You know how to grow and you’re sure you are good at it. Then you grow a nice clone-plant of nice sativa family full of positive genetics from the proper mother, containing proper number of trichomes and you know for 100% that you cut it right in time.
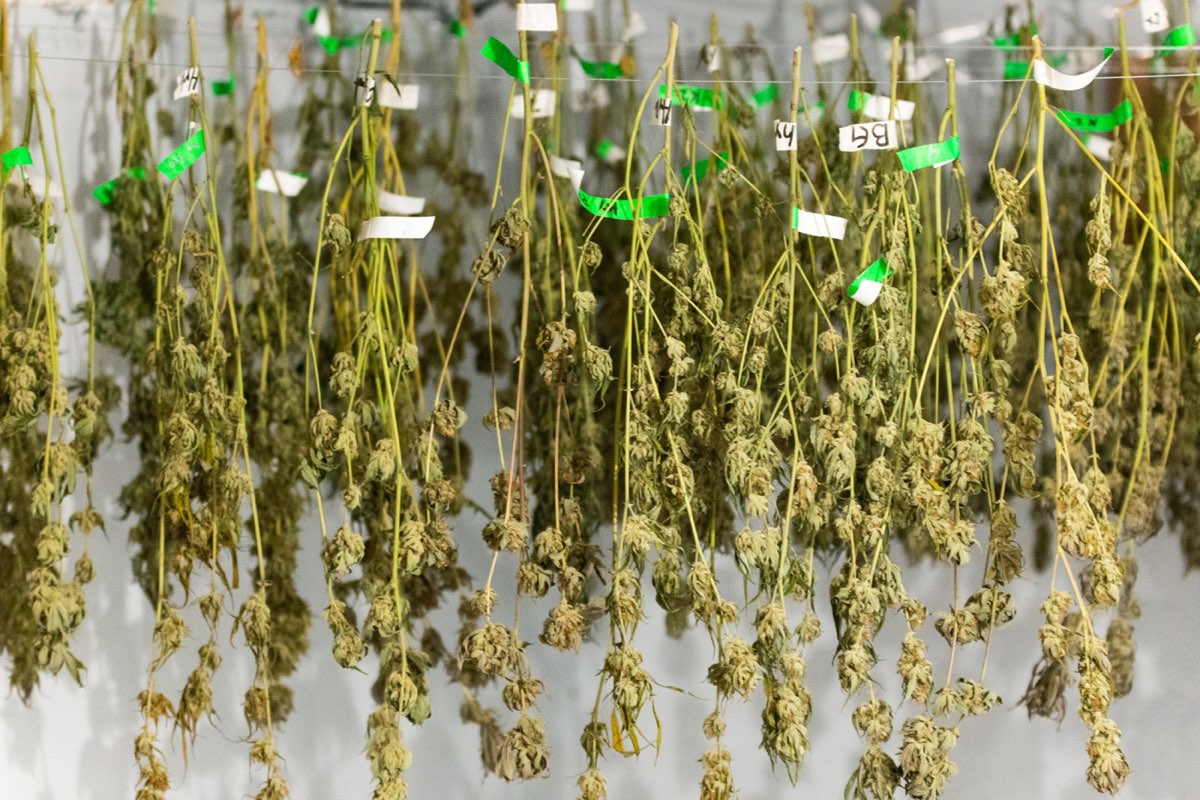
Marijuana Drying Techniques
It’s obvious that a true professional grower develops the relation with the every single cannabis plant. And it’s quite well-expected that the most active part of this development happens on the growing stage. Say, when the plant is alive, and it is kind-of very logical, but here we have another pot of puzzles to solve: the very professional cannabis growers all know that in the moment of cutting yet another extremely important period only starts — drying and then storing the cannabis product to have the best glorious pot out of it.
Why Drying / Curing is so important?
There is chemistry behind all this cannabis treatment always. Yes-yes, again that chemistry and as soon as we are dealing with the living thing, the carbon form of life, we never get rid totally of cannabis chemistry. It is the very same process why fruits get ripe after being harvested. The chemistry continues working.
There shall be NO! Light!
Cannabis is the complex organic matter. All organic thingies lose properties under exposure to the sunshine or another good light. Like, chlorophyll is giving green colour to the buds, and your buds will be ugly if you not hide them in the dark. And it’ll certainly loose the high components too, I think, not completely, yet we do not want it to happen, as we are to keep all! Easy to understand the conception, when you think about usual paper getting yellow and less elastic when exposed to the sun for long, or a paint on your walls or on your cloth: the sunlight is merciless, it gives everything and it takes everything, keep it in mind.
Mind THC when you dry cannabis plant
There is no pure THC inside the plant, but there is THCA which changes into THC when the temperature hits and then vaporizes. By curing you increase the effects and the amount of THC that shall work on you, means: better cure give more potent buds and less loss of the desired components.
While curing is technically the other process, it’s still very close by the idea. And the official difference that you cure it enclosed, that the plant (already dried as the curing goes after drying) gives away less of its moisture, rather than when is being dried. Under some conditions we can skip curing or combine it as one process (until you do it for yourself, not commercially, and can try this quality vs the other, experimenting).
Can it be too much of drying cannabis plant?
Anything can be too much. Many think weed and cash cannot, but they can, and the drying marijuana either. Many professional growers mention, that the best cured buds happen after a month or about of very proper curing. Never tried by myself tho, as my buds are burnt into smoke much earlier, all of them. However, one obvious problem of a ‘too dry’ is that trichomes start braking easily and you loose the potency. I think in time THC should start disappearing either, so you need to pick it up at its prime. Matter of XP (experience), no less, and I never heard about a stoner able to wait to long, which makes this issue theoretical, yet others are real.
External threats and issues for drying cannabis
Mold id the Enemy. Hopefully there is no mold around in your place, but you need to keep an eye, checking it carefully. It may also hit live growing cannabis plants too. See the head picture? It’s a mold on it! Bugs and pests are to avoid, and the other house animals, cats, dogs, also small children, elder brother maybe, and of course – a mom sometimes may ruin the harvest even worse than the others mentioned here, hahahaha ) ) )
Drying cannabis in One piece
There is a certain misbelief that drying a plant in one piece may allow more THC come up from the stem to leaves and buds. A total untrue. Among other reasons there is a simple fact that the water moves up in stems and branches, due to water surface tension, which is stronger than the gravity when it comes to micro pipes (and this is how water elevated from the ground to the very top of the cannabis plant.
And a complete total untrue for those couple of plants of indoor cannabis that you grow at home in personal-consumption volumes. Significantly longer drying is the only thing that may happen and you definitely do not want it. If you still feel explorer then try it and make your own conclusions.
Best Drying Conditions, Temperatures, Humidity for Weed
From 18 to 24 degrees Celsius (65 to 75 Fahrenheit). Humidity 45-50 percent. Darkness is essential for marijuana buds through all drying process. If all is done correctly then in 6-10 days the plant starts being dry. Check how far it is dry by tactile check and apply for the ultimate phase — curing.
Common Cannabis Plant Problems: Seeds, Roots and Stems
Thu, 19/Sep/19
Cannabis plant may suffer a certain amount of problems and sicknesses, and this troubleshooting guide we have compiled as a practical advice to diagnose a problem, how to recognize and prevent the possible seed issues, root issues and stem issues. There can be also pH and water related leaf symptoms, but we focus on the very base – hit which one to jump to: roots, stems and seeds. And in the first place you should find the part of the cannabis plant or type of plant material that is showing a symptom that makes you think there is a problem.
Seeds Issues
Jump to: Stem Issues or Root Issues
These are the beginning of life for the cannabis plant, and any problems with such a base of life will result in poor performance throughout the entire grow and finally affect the total yields. This is the common picture of cannabis seed we all know it well.
The Ideal Seed
The ideal seed is a dark green, almost brown, may also have sort-a ornamental stripes or markings, also depending on genetics. A viable seed is plump and firm. Applying slight pressure on the seed should not crush the outer coating.
Brittle Seed
A brittle seed, less brown or too light green, or if you push slightly and it cracks or otherwise break the coating – all these demonstrate that the seed is not yet rite and most probably it will not survive to maturity. Remove such seeds at once. And then while producing the seeds – in case you do not buy ready steady seeds but instead going to do it on your own – it’s recommended to keep them growing until they naturally fall to the ground which is a healthy approach and seeds will be naturally ripe and ready to produce a new healthy cannabis plant in your garden.
Green Seed
The green seed however can be saved, but just there is no actual reason to do so except that it is literally the last seed in this particular genetic collection, or you are a castaway in a small piece of land in the middle of Pacific alone, whatever. To save such seed one should be out into paper towel into dark warm place – right, like you do while germination. So if it goes darker and then finally sprout – plant such seed closer to surface, as soon as it does not have enough nutrients in its stock to make the full way.
10 Top Reasons Why Seeds Do Not Germinate
Too big, too small?
Size does matter, after all
Zu groß, zu klein?
Er könnte etwas größer sein
(from ‘Rammstein’)
1. Too Cold. Cold temperatures can kill seedlings by preventing germination or otherwise result a slow, uneven germination and provoke attacks by soil diseases.
2. Too Hot. Higher temperatures result a dry soil and injury to seeds or seedlings.
3. Too Wet. Excess water prevents oxygen, and also cause soil fungi related diseases.
4. Too Dry. Water is just vital and essential for germination. So maintain the soil moisture and/or the humidity when germinating before putting into soil, by putting plastic wrap or glass covers.
5. Too Deep. If planting cannabis seeds too deep then the sibling shall need more energy to go through while the amount of it is still determined by the capacity of the seed itself, as soon as it is filled with nutrients to supply this emerging stage. Limited “food storage” for a sibling may result a weaker plant in general. Recommended planting depth: ½ in.!
6. Too Shallow. If you plant cannabis seeds too shallow they can dry out too quickly.
7. Too Firm. If your mix of soil is too firm – that may affect the oxygen from getting to seeds and later – the roots, and also affect drainage.
8. Too Loose. Soil that is too loose will result in too much air surrounding seeds, making it harder to absorb moisture and your siblings will most likely dry out.
9. Soil Fungus. Keep it all clean – from your germination container, properly cleaned before you ever start, and then the pot well washed, and all the surrounding. And still any overwatering, lack of ventilation or drainage, may cause appearing of fungus attacking the seeds. Prevention is the best (if not the only) tool against these ones.
10. Non-viable Seeds. By any reason unviable: whether if the seeds have been stored improperly or been damaged, or simply immature seeds (see above) or just lack of luck this time without any visible reason.
Roots Issues
Jump to: Stem Issues or Seeds Issues
Roots are the beginning of the plant. They supply everything to the buds through the whole plant system. You need a strong and healthy root system to be able to pass enough nutrients all way up to support the plant at its maximum growth rate.
As soon as the whole root structure is not much visible it is important to take proper preventative measures to avoid even any possibility that roots ever develop problems.
Tight-packed Roots Curling Around the Edge of the Pot
That one is a very common scenario especially in the conditions of limited grow space – like a pot, for example, or any other container. The very beginner grower mistake at the same time, and quite predictable too. Also keep in mind that the roots take less advantage of the container’s horizontal space. Just give them more space.
Root Stunting
Root Stunting – when roots become chunky and in the laterals especially, and the whole system may discolor to brown or grey. Root stunting is often a result of calcium deficiency, acidity, aluminum toxicity, and boron deficiency or copper toxicity.
Loose and Weak Roots
Generally speaking roots grow well in a space with a carefully maintained pH and lots of oxygen. And weak thin roots can be an early message that you need more oxygenation. Poor drainage or tight soils can be reasons – check them first.
Smelly Roots
Sounds disgusting to me. Okay, this is lack of oxygen making the condition in which roots start rotting. I would not try saving a rotten plant, yet it can be saved in some occasions, and let us consider this is the worst root problem to avoid.
Stems Issues
Jump to: Seeds Issues or Root Issues
Stems transport all nutrients from the soil through the roots into the leaves and buds. Nice strong thick stems demonstrate the health of the whole system and result good frosty harvest in the end.
Leaning Branches
This is also related tot he next issue with weak and long – and both are about strength in the stems and branches, but just different reason. Except lacking the light the reason may be in lack of wind, and the plant cannot simply train the strength. Give more wind and your cannabis girl shall become more sporty and well fitness’ed then )
Thin and Tall and Looking Weak
The most common for this is lack of light. When getting insufficient amount of light the plants start stretch into direction of poor light source. In the early emerging stage of the plant just dig it down deeper when transplanting. Adding an extra fan to increase the airflow is also a solution – it may strengthen the stems because they’ll resist stronger wind. And in any case – add more light if such possible.
Broken Stem
This is not the end of the world yet don’t panic. Tape the broken stem together with the undamaged stem or stronger branch with a string. Using some additional supporting pole is also a good idea. Give it a lot of time to recover before giving load back onto the damaged part.
If it was a cat or a dog who damaged the cannabis plant, then think twice then, as soon as cats and dogs are also the carriers for germs of all sorts ann varieties, that can bring even more harm to your cannabis plant.
Complete Guide To Using LED Lights For Growing Marijuana
Fri, 21/Dec/18
Using properly LED lights for growing weed indoors is the essential and vital for the plants and for the quality of the future marijuana harvest. Read how to avoid the common problems, how to choose a led-light for the best efficiency and how to install it properly inside a home growing space: proper distance, proper schedule, enough power, …
Modern LED grow-lights already have a wider light spectrum for a better, greener and healthier growth, and as the specialized lenses have been developed to point the light directly onto the plants to increase light penetration, yields are much bigger than when compared to the models from just a couple of years ago. This guide to using LED lights for growing the indoor medical weed will tell you everything you need to know to have a successful harvest.
Why Choose LED Grow Lights?
There are several different types of grow-lights to choose from, so why are LEDs the best choice:
1) LED grow lights are cutting edge and use a customized light spectrum for the best growing results. They evolve permanently, and entertain us with new inventions like COB, for example, which is a new chip-on-board technology for lightening your home crops of hemp or weed, whatever your reason is.
2) This type of light produces plants of the excellent quality: impressive smell, high THC potency and trichome development.
3) There is no need for any ducting or exhaust system – LED grow lights can simply be hung in place over the plants and allowed to cool down by themselves
4) LED grow lights produce a higher yield for a comparable amount of electricity than CFL grow lights as they are more efficient
5) LED lights require no daily adjustment
6) This form of lighting produces less heat than a more traditional CFL set up and comes with a range of convenient cooling options such as in-built fans and heatsinks so maintaining a comfortable temperature is easy
7) LED lights offer a “plug and play” lighting system, allowing them to simply be plugged straight into the wall with no need for a ballast
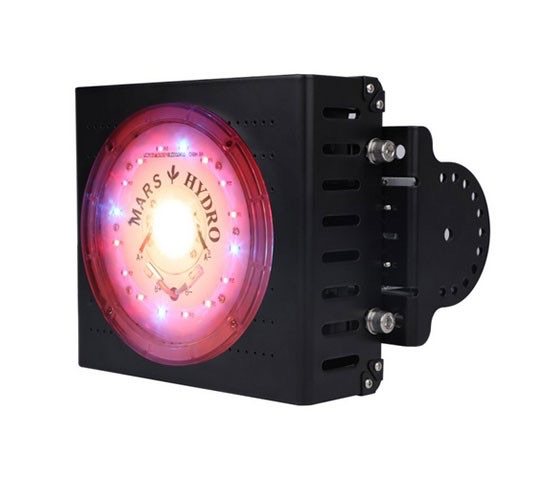
— MarsHydro COB Led-growlight – www.mars-hydro.com. COB stands for Chip-On-Board, the latest all-in-one technology in lighting the indoor marijuana crops.Read more about fancy new technology – the COB – by this link: COB LED LIGHT — ILLUSTRATED
How Far From The Plants Do The LED Lights For Growing Need To Be?
One of the things to watch out for when using LED grow lights is that they must be placed at a greater distance from the plants than traditional CFL lighting, and this means that you need sufficient height in your growing space. LED grow lights must be kept at least 30cm to 45cm away from the top of the plants – a big different when compared to the few inches which is suitable for CFL lights.
Many LED lights come with manufacturer’s guidelines as to where to the height at which to place the lights above the plants, however many growers produce good results by starting higher and then moving lower towards the tops of the plants as they grow. When using 400W or 600W LEDs, some manufacturer’s recommend beginning as high as 90cm and then gradually lowering their height to around 18” over the course of two weeks. Although lights vary between manufacturers, a general guide to the correct height for LEDs is as follows:
Seeding
24” (60 cm)
Germination
24” to 30” (from 60 cm to 75 cm)
Vegetative Stage
18” to 24” (from 45 cm to 60 cm)
Flowering
12” to 18” (30 cm to 45 cm)
How To Use Your LED Lights For Growing
When choosing LED grow lights, often you will find that you achieve a better result when using several small panels rather than a couple of larger ones. For example, two 125W LEDs (with a total of 250W) often produces a better result than a single 250W model and this is because it is easier to spread the light around to the most needed spots with more panels.
LED lights for growing with a 3W chipset are generally the most effective at producing a larger yield and are unlikely to burn the tips of the plants. Overall, you should aim for 50W to 60W per square foot of growing space when buying LED panels to get the best result.
Avoiding Common LED Grow Light Problems
Although LED lights for growing produce great results, they can be tricky to get to grips with since they grow plants in a different way to other types of grow lights.
One of the main problems is that if the lights are placed to close to the top of the plants, they can cause the leaves to become discolored, in the same way as a nutrient deficiency woord, even if you know the nutrient levels are ok. This is an especially common situation during the budding/flowering phase, particular toward the end of the flowering phase. The tops of the buds may also bleach due to excessive light, so it’s important, therefore, to keep the lights a minimum of 30cm to 45cm inches from the tops of the plants to guard against this light burn problem. You will be able to tell if your plants are suffering from light burn as opposed to nutrient deficiency because the lower leaves will look healthy and green while the top ones look discolored.
Another thing to watch out for is the possibility of accidentally over-watering your plants. This often happens when switching from more traditional grow lights which produce a lot of heat since plants grown in hot environments need a lot of water. As LEDs produce considerably less heat, less water will be required and giving your plants too much can result in damage. The roots of your plants will need oxygenation in order to grow quickly, and over watering will reduce this process, thus reducing yield and plant growth.
Since LEDs produce less heat than traditional grow lights, you may also need to think about investing in a heater for your growing space, especially if you live in a colder environment. You may have been used to your traditional lighting providing sufficient heat for your plants to grow, but without this added warmth, your plants may fail to flourish unless you add an additional heat source.
LED grow lights are a costly investment, so you need to make sure that you take good care of them. While the money that you spend on this light type offsets the expenses of other types of lights such as venting systems, air conditions, reflectors and ballasts, not to mention the excessive electricity consumption, you could find that your LED lights for growing can be damage if a lot of high wattage devices have been connected to the circuit as this can result in voltage fluctuations which may damage the power drivers in the lights which provide power for the diodes. This is especially important to note if you are powering your grow space with solar energy, since this type of system is prone to power surges and spikes. The best way to take care of your LED lights for growing is to buy a power stabilizer which can regulate the voltage being emitted from the power box, eliminating the power fluctuations which could damage your device.
One further problem to look out for is a possible magnesium and calcium deficiency in your plants. This is again because of the lower heat levels that LED lights produce. Since the plant leaves will transpire less moisture then when grown under an HPS system, this means that the magnesium and calcium ions will be less mobile, thus causing deficiencies that will need to be correct with extra nutrients. Although this is a simple problem to rectify, it’s important to be aware that it could occur, since the soil will already contain the right level of magnesium and calcium. The good news is that supplemental magnesium and calcium nutrients can easily be bought in grow shops and will solve this issue quickly and easily.
The Advantages of LED Lights
One of the greatest advantages of switching to an LED grow light system is that they can hugely save on electricity. As an energy efficient form of lighting, LEDs can cut your bills dramatically since they use up to 60% less electricity than more traditional forms of grow lights. Another advantage of LED grow lights is that they reduce your growing footprint, especially when compared with running HPS systems which draw a lot of energy.
For even greater convenience, LED grow lights provide full spectrum light wavelengths, and that means that there isn’t any need to switch your bulbs for the flowering and vegetative stages, since one set will work for both phases of your plants’ growth. Since LEDs also produce up to 80% less heat, it is much easier to climate control and vent the growing area, and much cheaper too, especially if you’ve been using an air conditioner to keep the space at an appropriate temperature.
One further advantage is that LEDs contain UV light for less fungus, mold and pests, and as they have a lifespan of up to 50,000 hours, you won’t need to replace them very often. Yes, they may be expensive as an initial outlay, but they recoup the expensive in around four to five growing cycles.
As LED grow lights produce considerably less heat than traditional lighting types, there is no need to water your plants as often since evaporation will be reduced. You’ll also need to add fewer nutrients since the plants will use up their food less quickly due to reduced heat and reduced water. This means you’ll have much less maintenance to worry about, less chance of unwanted nutrient build up in your growing medium and also less risk of accidentally over-fertilizing. Not to mention the cost savings that you’ll enjoy too!
LED grow lights are also known for producing a better aroma and taste than other types of grow lights since the lower temperatures in the growing space allows more flavonoids and terpenes to stay inside the plant tissues instead of being lost into the atmosphere. This means that there will be a less strong smell in your growing area and a more tasty and flavorful bud.
Since LED grow lights are conveniently and much smaller than bulky HPS lights, they will take up a lot less room in your growing space. This means that you can use a small grow tent for a more discreet approach, or grow more plants in your available space than you would have been able to with larger lights.
With the advantages of switching to LED grow lights becoming clear , it’s easy to see why they have become so popular with growers over the last few years. Modern LEDs are powerful yet efficient and are also cheaper to run compared to older style lighting systems, and since they run cooler they are a much more convenient solution to growing at home.
As they are optimized to the plant light spectrum, they provide a customized approach to growing that doesn’t waste energy and yet produces an impressive yield and product. As time goes on, it’s likely that even more people switch to this style of grow light as their benefits are fully realized.