Re:
Light Emitting Diods (LED) are used widely, and in application to marijuana cultivation they are the artificial lights based on LED technology, replacing natural sunlight for the indoor grow with or without a grow tent. A perfect tool to manipulate the light regime for better buds and a higher potency
The List of Mistakes that Beginner Growers make
Wed, 22/Feb/23
These are not exactly mistakes when you are into growing marijuana on your own because they are more likely a learning process. However, we have a list of most common mistakes that beginner growers make. And, applying these few simple rules shall give you a unique opportunity to commit greater mistakes on the further stages. There’s plenty of space for this in marijuana growing, haha.
How long does it take to grow a marijuana plant?
Patience you need to grow a marijuana plant – the otherwise is an often mistake, but you should not hurry at no stage of marijuana growing. In general, the full growing cycle takes about 4 to 6 months for a solid marijuana plant to ripe, where the term depends on many variables of the equation. Commercially offered seeds may give fruits as fast as 4-8 weeks.
How to decrease the marijuana growing term?
– Outdoor or indoor, where for the latter you can alter the term by changing the light regime: as soon as you set your light regime as 12 and 12 hours the plants immediately react ending the vegetation and just start flowering (producing buds that we smoke). Do not do that too early.
Apparently, for the outdoor, you cannot change the Sun astronomy, as it is the main and only source of light for the outdoor marijuana.
However, what you can do is select a proper date in the calendar when you plant seeds to have the Sun rolling over the sky in a 12 on 12 mode right when you need your future weed to flower. The very reason why some countries enjoy two harvests of marijuana per year.
– The genetics of seeds that you use influence the how-long question too. Autoflowering seeds are independent of the light regime but they take a certain amount of time for vegetation and then start flowering regardless of where the light is.
Autoflowering cannabis grows as fast as 4-5 weeks.
Feminized cannabis grows as fast as 6-8 weeks.
Autoflowers offered in the market usually need a shorter period from seed to weed and are considered to be the easier effort for beginner growers.
– Playing with nutrients for your marijuana plants, and this includes building a hydroponic garden, ease your waiting too. May it be a harder way to learn and perfect your skills, however the “plants on steroids” (enforced nutrients) shall perform fast similar to you wishing to grow your body promptly in a gym adding proper nutrients.
– Using clones shall make the vegetation shorter just logically. Doing so you skip the seed germination stage and seedling at all. There are pros and cons and a lot of arguments about growing marijuana from clones. We suggest it is not bad to use the clones but just using the clones is a different business and it certainly delivers a shorter growing term for your marijuana.
This or that, or a combination of the listed, but you are to accept that all plants are naturally slow, including the marijuana plants.
Being a first-timer, you’d better not cut the growing term too much but let it go the natural course for a cannabis plant to grow taking as long as it needs under the current environmental conditions.
The obvious exception is choosing an autoflowering seed or another kind of seed (like Ruderalis) with a genetically modified growing term (or should I better say a milder gene editing? Yes, this one as it reflects the idea of feminized seeds better), either embarking on a quest of growing your marijuana from a clone. The latter shall never grant you knowledge about how to germinate, nor what a seedling is, but we still recommend exploring the natural cycle before you alter it.
Note that the light regime alteration and leveraging on the chemistry of the nutrients are the advanced techniques.
How to grow marijuana easy
There is an easy way to stay away from the common growing issues. For this, you may treat a marijuana plant just as a regular plant, as if it’s no different from a potato or a tomato. You may lose a bit in quality (depending on what you count as “quality”) but this is the very idea of how you may grow marijuana easy, no stress, no sweat.
In all cases taking care of soil is the best efficient way, as it requires less effort compared to all other issues soil deficiency may produce; but you only once mess about soil making a DIY mix, then only watch how the magic happens for your joy.
How’s that possible to grow marijuana easy?
Because a marijuana plant is a natural thing and, after millions of years of evolution it can survive and give fruits without your assistance. Hence you may help weed to grow herself, and she’ll as high as in an Amsterdam coffee shop but in your household, satisfying.
At least this list of mistakes beginner growers gives a good idea where you look at along the whole process of your a hustle-free growing.
There are almost no bothering neither boring things in growing marijuana, apparently the mysterious fragrance shall encourage you every time you enter the grow space 😉
How to grow marijuana for free
One word: Soil.
Soil is the very source of everything for marijuana plants, all that they need to flourish well, yet the soil is too often underestimated by the first-timers; myself included.
Most of the most common mistakes that beginner growers make. The wrong soil can ruin everything. The proper soil can make all your efforts easy going all way up to growing your weed for free, or almost free, and it is as important as a seed itself.
The list of what you need to grow marijuana for free
1) Seed. Once upon a time we have picked a couple of seeds from street marijuana, and it has worked, and we’ve got high. This was an effective experiment of growing marijuana both successfully and free of charge. However, if you allow yourself a few buck investment taking a “professional seed” from a seed bank you’ll just gain a better chance to succeed.
Acknowledge that as a beginner grower, you may fail. But using a professional seed from a seed bank your odds are higher. But a free marijuana seed shall give you free knowledge of trial and error.
TIP! Pay the most of your attention to the cannabis seed germination stage. This is when the whole thing starts, and a seed gives a small root out of itself, such is called germination. Before you even send a marijuana seed into the soil you make it germinated in a Petri Dish. Very important.
2) Soil. Again, you can take a professionally mixed soil which is not a million bucks in price. But you can also use soil from your garden and it shall perform too, reasoning that a marijuana plant is a natural thing, while “wild soil” already contains hopefully an amount of desired nutrients for cannabis plants as long as other plants do grow in it all the way.
TIP! A rule of thumb is that random soil usually is too dense for a marijuana plant. You require to make it loose by mixing it with sand or crushed brick, which are also free of charge. Such shall allow more oxygen to come to the roots of your marijuana plant, also giving a better way for the nutrients.
3) Indoor or outdoor? Well, this depends on the climate overall and the current season in your region. We mention herein how to grow marijuana for free supposing you take the right season and climate.
In our experiment about using random seeds of street weed, we have put two already germinated marijuana seeds into flower pots but we have placed one pot on a balcony and the other we kept at home. The balcony plant went stronger and it reached its ripe. But the room plant went weak and sick too early and died after a few weeks.
The reason? The more natural environment makes a cannabis plant naturally stronger, as long as it is exposed to wind and rain and a temperature range it lives a normal life, so to say.
4) Water and light are very important for your future success with marijuana growing as a beginner grower. Please about further on in this post.
Finding the right soil for cannabis
We have mentioned above how important the soil is. It delivers all nutrients through the roots through your whole marijuana plant all way up to the buds. Therefore you pay the most attention to finding the right soil for cannabis, and here we share a few tips:
1) Where from? Once you have excavated a potful of soil from your garden, consider also taking other soil from “somewhere else” if you have several marijuana plants for your beginner’s effort. This is for seeing the difference between this and that soil.
2) Make the soil loose. Except that you’ve purchased a professionally mixed soil, in all other cases for a DIY soil you always make the soil loose by adding sand or crushed clay brick, some people use carbon for the purpose.
Loose and crumbly soil is always better for marijuana as soon as it provides better access for water and oxygen to the roots of a marijuana plant.
3) Ventilation. Make holes in your pot for better ventilation, and for the excess water to go out easily. Such shall prevent the roots of your marijuana plant from rot and a lack of oxygen.
4) Mites vs worms. Keep an eye on who else lives in your soil. There are useful beasties living in soil, and there are harmful ones (yet another reason to take soil from different places into different pots to see how marijuana plants shall go on growing in this and that case).
A tip? Worms are good, they provide better ventilation of your soil, also they process the soil elements into what plants “eat”. The other beasties such as mites and insects are not good and you’d better get rid of them, either take care of avoiding them from the start.
There are “professional” worms existing on the market, you can buy them to enhance your soil mix. We suggest they are not expensive.
5) PH level, also referred to as “acidity”, is important for marijuana growing. We suggest in wild soil the PH level is already fine, especially if you make it outdoors in your garden. But for the indoor growing, and in a case you are going to use nutrients hard, you keep an eye on a PH level.
For a marijuana plant the PH level is in a range from 5.7 to 6.2 for hydroponic or indoor, and up to 7.0 outdoor. There are relatively cheap PH meters in the market, designed either for aquariums or specifically for growing, both types may fit.
Otherwise, to keep your experiment as free as possible, you use that wild soil, as we mentioned, and you go outdoors (or balcony) so the plants are taking the most of nutrients from nature. Once you add nutrients the PH level is going to change, then you need to be checking on it periodically.
Choosing a seed
Many sources say, growing marijuana from an anonymous seed may be flooded with surprises and may hard your efforts, this is partly true. However, as soon as you’ve got a seed from weed that you’ve just smoked that makes your seed not that far anonymous, but yet.
Taking a seed from a trusted seed bank is still a good option and a minimal investment indeed. At least you shall know for sure that a possible fail shall not give credit to the seed. On the other hand, why not try, and more important the seed is a living thing, so shall be the future cannabis plant, you can just let nature go its way, otherwise buy seeds from a seed bank.
If you have decided to have a “some weed seed” consider the following advice
1) Ripe. The marijuana seed for planting should be ripe. That shall mean the color of a cannabis seed must be dark brown, not black, not green. Also, it must have curvy stripes on its surface.
2) Solid. The marijuana seed should be solid, bearing no cracks. Yes, this is a sort of obvious, but we saw beginner growers being so desperate that they take a damaged seed. The effort is doomed even before they got started.
3) Germination. Pay the best attention to germination, this is when a seed shows a small root. Read the easy way how to germinate weed seed below:
How to germinate weed seeds
– To germinate a seed you put a cotton cloth on the bottom of a shallow and wide cup or a container made of neutral material. That may be a plastic container used in the food industry, or a glass Petri Dish, that we find most convenient. No metal due to its acidity, and no possibly toxic material.
– Generously moisture the cloth with water. Use clean water. Do not be too greedy about the amount of cloth, have it clean, made of cotton, and let it form a sort of a bed for a seed.
– Place the seeds into that cloth. It should not be lying on a surface but be deep into cloth.
– Moisture another piece of cloth and cover the seed, or the seeds if you have few, with it.
– If you have a few seeds in one container give them space for sending out roots freely, for that place them apart from each other.
– Let the oxygen penetrate the container. Open it up once a day to ventilate, but you keep it in a dark warm place all other time.
– The whole germination may take a week, up to two weeks, so you be patient.
– Add water periodically to keep the micro-environment well moist, but not flooded.
Once your seed germinated you have a good chance to succeed. Weed may outcome being not of the best quality if it is a street weed seed, but what shall make that weed so important is that it shall be your weed.
What else do you need to know picking a random seed from street marijuana
The existence of a seed defines that it was a hermaphrodite plant where you found that seed. Professional growers only grow female plants, and those have no seeds at all. The offspring of your anonymous street marijuana plant, where you picked your anonymous marijuana seed, shall have a great chance of being a hermaphrodite too.
Such may result but not necessarily a lower THC level and poorer trichomes but be sure it’ll give you some high anyway. The logic is simple: you have already got high from weed wherein you have found that seed.
Marijuana overwatering
Marijuana overwatering is a very common mistake for beginner growers, especially for first-timers. Cannabis plants do not require a lot of water.
The good growers’ advice on watering your cannabis plant is: you put your pointer finger one inch down into the soil – until you feel moisture or see your finger is moist as it is off the soil, you need no more water yet.
Do not over-water your marijuana plant under no circumstances. Such may kill your whole plantation.
LED lights for growing marijuana
Light is essential for marijuana plants, as it is for any plant. If your plants grow indoors, then you need LED lights designed for growing and there is no other way. This is pretty much an investment. The whole LED lights set may cost you 200-400 dollars and shall add a ton to your monthly electricity bill for a few consequent months.
Besides, you can be f**ed by a wrong LED lights vendor delivering a wrong specter of light. You’d better learn about it before you buy any lights, and read comments about how reliable is the vendor you pick.
How do we decrease weed lighting cost?
The sunlight is the best for plants, better than anything artificial like LED lights, and it’s free. You try being outdoors in the garden or on the balcony, but make sure you are at the right season when it’s warm enough outdoors.
More important: marijuana plants switch from vegetation to flowering when the light regime becomes 12 and 12 hours. It means the Sun shines 12 hours a day and it’s dark the other 12 hours.
The light regime is the worst beginner growers’ mistake. You shall need to switch your LED lights into the 12/12 regime at a proper moment, and for outdoors you’d better check for the Sun’s astronomy in your region to gain the 12/12 sunlight regime at the end of the vegetation stage.
How do we avoid light-related problems the easiest way?
1) Use autoflowering seeds from a seed bank or a friend, because the autoflowering seeds do not rely on the light regime but they are designed to start flowering by time and not by light change. We have already mentioned, that the autoflowering seeds feature a shorter growing term overall.
2) Use Ruderalis, if you can find one, which I doubt. However, the autoflowering seeds mix the genetics of Cannabis Ruderalis to be independent of light. Cannabis Ruderalis is a wild plant originating from Sri Lanka and India, those have a lot of weed with strong genetics growing wild.
No panic if you still lack lighting or fail the regime setup. This shall give smaller buds, a weaker plant, but it shall give some buds and some plant. Of course, no great achievement if such happens, but this is your first try and you learn.
How much space do I need for cannabis plants?
Marijuana plants do need space for all three reasons: sufficient space for roots to avoid competition with other plants, a space for growing tall, and a space for growing wide. The latter is to prevent touching the neighboring plants too much.
1) For the roots: think about a big bucket, say, a 10 to 12-liter bucket (or a pot of this size) shall solve the problem. Do not forget to ventilate it as we mentioned earlier in this post. If you are planting marijuana outdoors give the same space wide, having no other plants (cannabis or not) just next to your weed.
2) For the tall: make it 1,5 – 2,0 meters over the soil level if you grow indoors or in a tent. You shall also need fresh air inside of your growing space, then you deliver proper ventilation to your plants.
There are certain techniques to use a smaller space by changing the geometry of the stems, but this is already an advanced level, and we talk here about beginner growers’ mistakes solely.
TIP! if you decide to buy commercial seeds from a seed bank, and you lack space yet, then you consider strains of a low height. There are very low ones in the market, as low as 50-70 cm.
Yet another tip: if you switch from a vegetation stage to a flowering stage by changing the LED light in your indoor growing space, then you can save on the height of that growing space by switching the light regime a little bit earlier. Plants shall continue growing when flowering but they shall not do that intensively as during the vegetation stage.
For the outdoors, there is no such issue, unless your neighbors are unfriendly. Use a fence for God’s sake, or, again, those seeds of low-height genetics. We should warn you about neighbors, should we?
3) For the wide: say, 2×2 meters is a bit wider than you need. Having lack of space, use 1×1 meter space. There is no strict rule about it, but just your marijuana plants should not be one by another.
Do not give too much care to your marijuana plants
Yes, this makes a certain problem more often than we can imagine, because you want your weed, and you value your efforts, but this is your first time and you know practically nothing.
Therefore, you’d better be patient, you’d better accept there shall be mistakes, you’d better watch to learn than expecting the frostiest harvest of all time from your first attempt.
Do not over-care your plants, give them time, wait and be watching more rather than doing, and don’t be too much of a mom to your plants.
A good example of over-care is over-watering, as we mentioned here, and the next two listed beginners’ mistakes are such as well:
Cutting marijuana leaves
You’ve heard of course that cutting marijuana leaves during the flowering stage may dramatically increase your future harvest of buds.
How does cutting marijuana leaves perform?
Once you cut tips of the marijuana leaves, either very tips, or up to one-half of the leaves, or just decimating the whole leaves of the plant, you save nutrients delivered into the leaves, as those get smaller in size, and the freed amount of nutrients goes all into buds making the latter bigger, higher, frostier.
However, this may form a real problem for a beginner grower due to the lacking experience. Many superior professional growers do not recommend for absolute beginners to use scissors to cut marijuana leaves at all on the first try, excluding maybe a few too obvious cases.
Do not over-dose the nutrients
Imagine that you have decided to use the nutrients, even though skipping it shall cut the cost even though requiring proper soil, proper light, proper space, etc. To use nutrients staying away from overdosing when you are a beginner grower there is a safe way:
Use a simple trick until you learn this science better: add nutrients in very small amounts carefully and watch how the plant reacts but give sufficient time for the reaction.
Any change in color of any part of the plant or any other change, anything seeming abnormal, may mean (but not necessarily) an overdose of nutrients or a nutrient. The overdose of nutrients may even kill a plant.
There are exceptions about the color change, like, “going purple” may reflect a too low temperature or another environmental issue, or stress (where overdosing is stress too).
Growing for the first time without nutrients at all or just tiny to small doses shall grant you a better understanding of the whole process. Because in case of an unknown issue you shall have less range of guess about what you’ll have done wrong.
Keep notes while you grow weed
A good piece of advice for a grower of any experience is to log whatever you are doing to the plants and whatever is happening to the plants. This shall help to learn the whole process, and to track the experiments, how your ideas, the weather, the season, and the nutrients influence the plants. You shall find these notes useful for your next trials, this is how the knowledge is accumulated.
Marking plants with small tags is a good idea too in any case, especially when you treat them differently, like, a different nutrient regime, different soil, light, genetics, whatever differently you apply to your marijuana plants.
When to harvest marijuana
Choosing when to harvest marijuana as a beginner grower you may miss the right moment, or cut the bud too early. The latter is coursed by impatience (of course, you already know how important is to stay patient in a plant business, do you?) and the former is merely greed about higher THC. Needless to say that losing a whole harvest at the very end after weeks and weeks of growing efforts is an “epic fail”.
Trichomes you watch to catch the right moment for harvesting your marijuana buds.
Some people advance to using a microscope to detect the best condition of the trichomes, but a 10x magnifying glass (jewelers use such and sell in their shops) fits well enough. Alternatively – a good pair of eyes, trichomes are actually visible.
For a beginner grower, the best time for harvesting marijuana comes when approximately 60% of trichomes are amber, and about 40% remain milky-white. There is an argument about how much trichomes should get ripe, which means amber color, and we suggest this is a matter of personal preference. We cut when amber to milky reaches roughly 60/40.
Ready to hit the road now?
As a rule of thumb you always keep in mind two simple ideas: “never panic” and a “no rush”, this is the best way to win in growing your marijuana.
We dare to say that no beginner in the whole world ever avoided mistakes that beginner growers make. That is why they are called this way. Just stay come and give time to your plants before you doom them to fixing a nonexistent issue.
Anything that may ever happen to your marijuana plants shall work for your experience. Your sticky frosty buds, which you are getting in the end, are the best in the world, because they are the buds, that you have grown.
Peace and love.
How to grow weed from clones
Sun, 07/Nov/21
Growing marijuana from clones is a natural process, even though quite stressful for plants. You should definitely feel the benefits of making weed from clones, while the whole deal is no harder than a classic from-seed-to-weed growing. It does not make you choose between a seed aand a clone, but knowing how to grow weed from clones is a great opportunity indeed.
Growing weed from clones full guide in 8 steps
(1) Select a mother plant and a lovely branch on it that you are going to cut for a clone, or follow someone’s recommendation.
(2) Idyllically, before you cut a clone from a mother plant, keep the mother plant clean from nutrients for 3-5 days.
(3) For the cut, you’ll need a blade or a razor, distilled water, a rooting hormone, and a rooting medium (like rockwool).
(4) Cut the clone at a 45-degree angle as close to the stem as possible with a sharp blade to tear not the tissues of the plant, like if you are a surgeon.
(5) Moist the rooting medium with a nutrient rooting solution.
(6) Put the just-cut clones into holes you’ve made in the rockwool cubes (your rooting medium).
(7) Keep moist, give light, and wait till roots sprout.
(8) When roots are ready, re-settle a plant to the usual place, where it continues to be a regular plant.

— ARE YOU SAYING, THERE’S NOTHING UNIQUE IN ME?
(from “Madagascar” motion picture)
Why should I try growing weed from clones?
Growing weed from clones is rewarding, you save on time, and you are on a slightly different process, so you learn more growing options. The most important, however, you copy the mother plant, its gender, character, and future harvest, hopefully, you copy everything.
If you’ll like cloning, that shall lead you to marvelous buds. The other way shall do either, but growing weed from clones is just another way to an excellent toke, and you choose which fits your character and please your heart the best.
-
You cut clones from selected female plants from a grower you know, then you get the same copy of the plant of the same strain, the same strong character, the same fertility, and 100% female.
-
In a tight growing space, like indoors, having a guaranteed female plant (and not feminized) may count as a huge and unique opportunity.
-
You reduce total growing time because you already have a small plant at the start. It will take a week or two from the moment you cut till the clones give roots, then they immediately leap to the vegetation stage. This is a shorter period than growing from seeds.
-
Amounts of nugs from a properly grown clone plant may beat any feminized seeds project. Growing weed from clones saves time, and the whole term is a little closer to the speed records that autoflowers seeds do. Even though clones shall grow one-two weeks longer than the record-breaking out-of-the-seed strains, an amount of top-notch bud you harvest from a proper clone shall conquer your heart!
How to cut a clone?
Keep mother plants away from nutrients to reduce the nitrogen in branches and leaves. The excess amount of nitrogen may provoke clones to start vegetation rather than rooting.
Keep everything sterile and clean as if you are a surgeon. Have your razor or a scalpel super sharp, and super clean. A good cut shall give less stress and a healthier cutting shall sprout better roots.
-
Choose a fairly healthy branch 4-6 inches long (10-15 cm) idyllically bearing 6+ nodes.
-
Cut it at a 45-degree angle with a blade and as close to the stem as possible.
-
Make one clean sharp cut. Do not tear the tissues around the cut: have a blade super sharp, and a hand steady.
-
Do not expose a fresh cut for too long to air, place the fresh cut into distilled water as quickly as you can. This shall prevent air bubbles inside tissue around the fresh cut.
-
Dip the cutting into hormone gel to stimulate root growth.
-
Place the clone into wet rockwool (or another medium).
-
Cut more branches than the number of clones you plan. You are going to lose some.
-
Give sufficient light upon clones.
-
Keep rockwool wet but no over-flood.
How to prepare rockwool for marijuana cloning?
Distill water is a good choice if you intend to use nutrients in the rooting solution. Otherwise, you can come up with regular clean water, you usually use. Into distilled water add a small amount of nutrient to reach 5.5 PH, then stop. Using nutrients in a rooting solution for clones will encourage roots for better growth.
Dip rockwool cubes in rooting solution, and leave them there till they get generously moist. As soon as you have a rooting solution ready it takes 15-20 minutes to prepare rockwool cubes to accept marijuana clones.
Make a hole in each cube. The holes should be a little smaller or equal in diameter to the branches that you cut for clones. This shall let transplants sit tight and stay vertical, also giving a smaller load on roots, as they are ridiculously weak when they only come out of clones.
Growing clones outdoors
Before growing clones outdoors, you better start indoors, except that the weather is exceptional in your garden. No cold nights, good strong sun in daytime, and you can hide the clones from the wind (the roots are yet to appear, then new roots are weaker in the early stage, than the roots of plants of a similar size grown from seeds). Superior conditions may let you start your clones outdoors.
Usually, people start clones indoors. Then, when the plant reaches the bottom of cups with its roots, you transplant it to the outdoor environment. The plant and the roots are relatively weak in the early stage while sprouting that is why we are to create more comfort at the beginning.
Apart from that, outdoors is not hell for the clone plants, but a harder environment can kill the attempt. Give tender conditions for clones if they run a whole cycle outdoors: protect from wind at minimum.
Temperature for clones indoors
Cloning techniques are practically designed to grow marijuana indoors. So you grow clones indoors in the same conditions you grow regular marijuana plants. During the rooting stage maintain the temperature at 72-76 F (22-25 C) point, and you set 18 hours of light a day. Keep everything super clean as usual.
Watering weed clones
In the early stage, when you just put fresh transplants into the rooting medium, it is important to keep the whole system from dry to slightly moist. The roots shall be trying to find their way to water and grow faster and longer. It does not mean a Sahara desert in your pots (or cups) where clones grow.
If you choose soil as a rooting medium, fertilizers become optional. Because soil is already naturally fertilized, even if you try a random soil from your garden. Adjust the nutrients later if you want, but good soil requires fewer nutrients or even none of them (a rule of thumb).
On the other hand, nutrients help transplants to survive stress. The whole story is stressful by definition, so don’t be too far into “all-natural” once you are already on the track of genetic experiments, already doing clones.
Rooting mediums for clones
-
Water is the cheapest rooting medium, use distilled water if you plan to add nutrients (you better do). Adding nutrients, keep PH 5.5. Then place your clone in that water solution, and wait till roots start to sprout.
-
Soil is the natural rooting medium. It’ll require less maintenance, you take it as is, but taking proper soil like from a growing store shall make your attempt easier. Place your clone into loose soil, keep the soil moist but no over-flood.
-
Rockwool (aka mineral wool) is an artificial rooting medium and a perfect fit for clones and rooting enterprises. It is a good and relatively cheap investment that shall repay greatly, especially if you are a first-timer:
-
-
It gives optimal airflow for roots and retains water as good as we need for clones to sprout.
-
Easy to carry as soon as the rockwool cube, where the plant sits is already holding the shape well (compared to water or soil). You can put all clones into one tray once they are in cubes, which is convenient. For example, for watering.
-
The rockwool lets your plant sit tight in a hole, so the root takes no load, and the stem stays immovable affected by air movement (including breeze if outdoors, but you do not expect they shall survive a gale, you better hide plants from the weather for a while).
-
Once your clones sprout roots
You better keep in mind during the whole process of marijuana cloning, that the situation you create for the plants is way stressful. Even though the transplants (clones you cut) struggle to survive, it is a natural process like falling branches do in the wild nature, but you just pursue a higher success rate of survival of clones. So once roots start appearing:
-
Keep light at 18 hours per day regime.
-
Keep the temperature at 72-76 F (22-25 C)
-
Expose clones to air movements.
Exposure to air movement shall make stems and roots stronger, otherwise, they risk falling within a day or two, when you relocate your clones into a real environment. It’s early to say “give them wind” at this point but you try making air movement by ventilator working at a distance, slowly increasing to the light breeze. Bringing clones to the open air when the weather is marvelous is a good idea. Wind resistance you train in your clones, and especially if you prepare them to settle outdoors, once they are normal plants.
How long do clones take to grow?
The overall term depends on the mother plant. Just like she did so shall do, or should do, the offspring. However, what kind of benefit, among others, the clones give us – we cut the term skipping the germination stage, and the early vegetation stage. We spend 1-2 weeks for rooting instead, then we are in the middle of vegetation. Roughly, clones make the whole story a few weeks shorter, it should be beyond a month: 6-8 weeks.
What do scientists say?
The inventor of teleportation said he will never step into a teleportation cabin. Yes, it is invented as they have successfully teleported photons over a 143 km distance, about 88 miles. Somewhat a copy too.
“We know shit about biology,” — says Craig Venter, a former leader in the Human Genome Project.
Again, it is not bad to play with growing marijuana clones. There are certain benefits, we have mentioned in this post, and it is a natural process but just you aid the nature to increase the survival rate of clones. That is what you do by setting up the idyllic conditions for clones to root.
Clones vs seeds
Finally we list up pros and cons as a comparison of growing weed from clones vs growing weed from clones. The important message is: even though you stick to clones, which are great to be stick to, you won’t escape growing from seeds.
Sooner or later you will discover that a number of clones you take from the same mother plant is limited, and you’ll need to change her. On the other hand, taking clones from clones may work. There was one guy in Alaska, who cloned the Matanuska Thunderfuck (MTF) strain away from law enforcement eyes for 20 years to preserver the unique genetics of MTF. The strain is now available in the market, by the way, but often branded as “Alaskan Thunderfuck”. Leaves of MTF have fangs, boo!
Marijuana plants raised from seeds are in general stronger, as we mentioned already in this post. They feature stronger roots, and a subsequently stronger development of the whole system.
I prefer thinking about weed clones comparing a country-side guy to a megalopolis nerd, the latter represents a clone, and the former represents a plant from seed. Unscientific, I know, but I am that megalopolis nerd, and I now live in a country side, so I know the answer, ha-ha.

Complete Guide To Using LED Lights For Growing Marijuana
Fri, 21/Dec/18
Using properly LED lights for growing weed indoors is the essential and vital for the plants and for the quality of the future marijuana harvest. Read how to avoid the common problems, how to choose a led-light for the best efficiency and how to install it properly inside a home growing space: proper distance, proper schedule, enough power, …
Modern LED grow-lights already have a wider light spectrum for a better, greener and healthier growth, and as the specialized lenses have been developed to point the light directly onto the plants to increase light penetration, yields are much bigger than when compared to the models from just a couple of years ago. This guide to using LED lights for growing the indoor medical weed will tell you everything you need to know to have a successful harvest.
Why Choose LED Grow Lights?
There are several different types of grow-lights to choose from, so why are LEDs the best choice:
1) LED grow lights are cutting edge and use a customized light spectrum for the best growing results. They evolve permanently, and entertain us with new inventions like COB, for example, which is a new chip-on-board technology for lightening your home crops of hemp or weed, whatever your reason is.
2) This type of light produces plants of the excellent quality: impressive smell, high THC potency and trichome development.
3) There is no need for any ducting or exhaust system – LED grow lights can simply be hung in place over the plants and allowed to cool down by themselves
4) LED grow lights produce a higher yield for a comparable amount of electricity than CFL grow lights as they are more efficient
5) LED lights require no daily adjustment
6) This form of lighting produces less heat than a more traditional CFL set up and comes with a range of convenient cooling options such as in-built fans and heatsinks so maintaining a comfortable temperature is easy
7) LED lights offer a “plug and play” lighting system, allowing them to simply be plugged straight into the wall with no need for a ballast
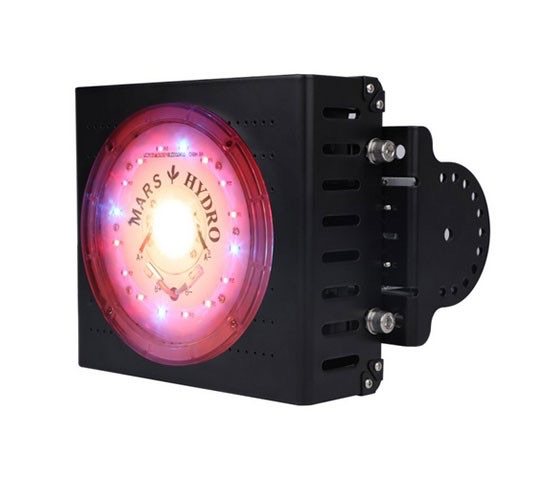
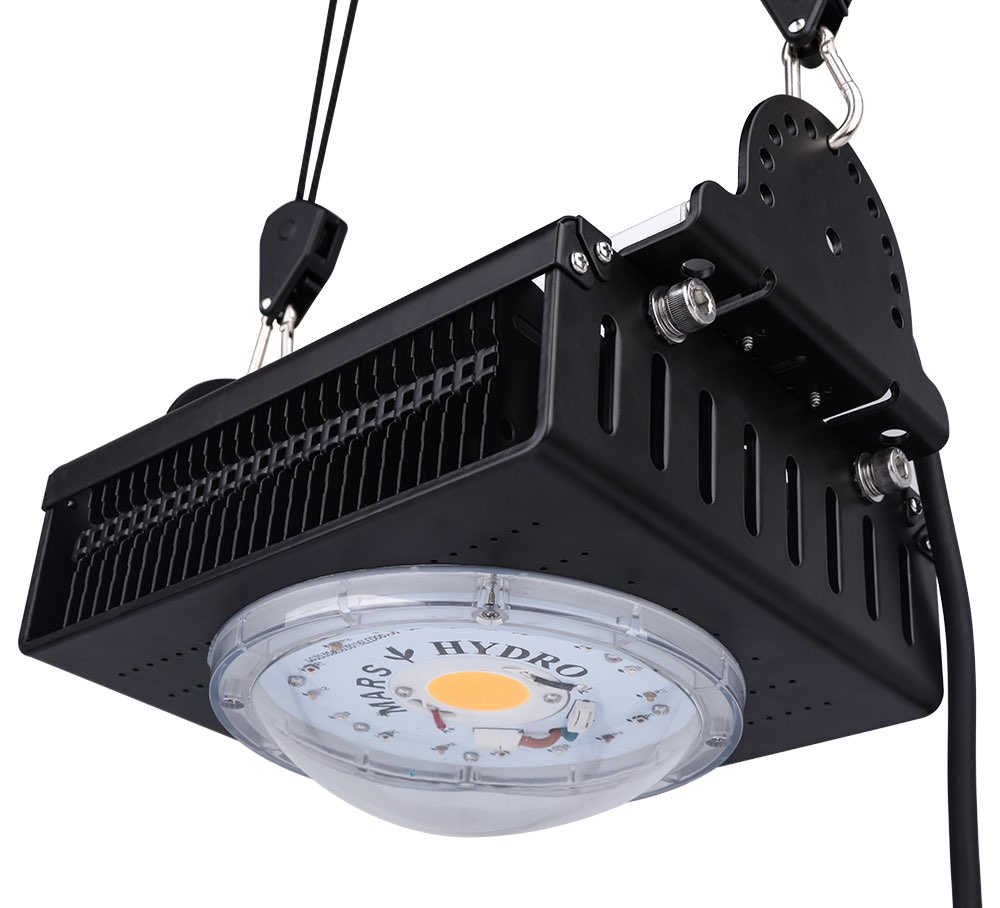
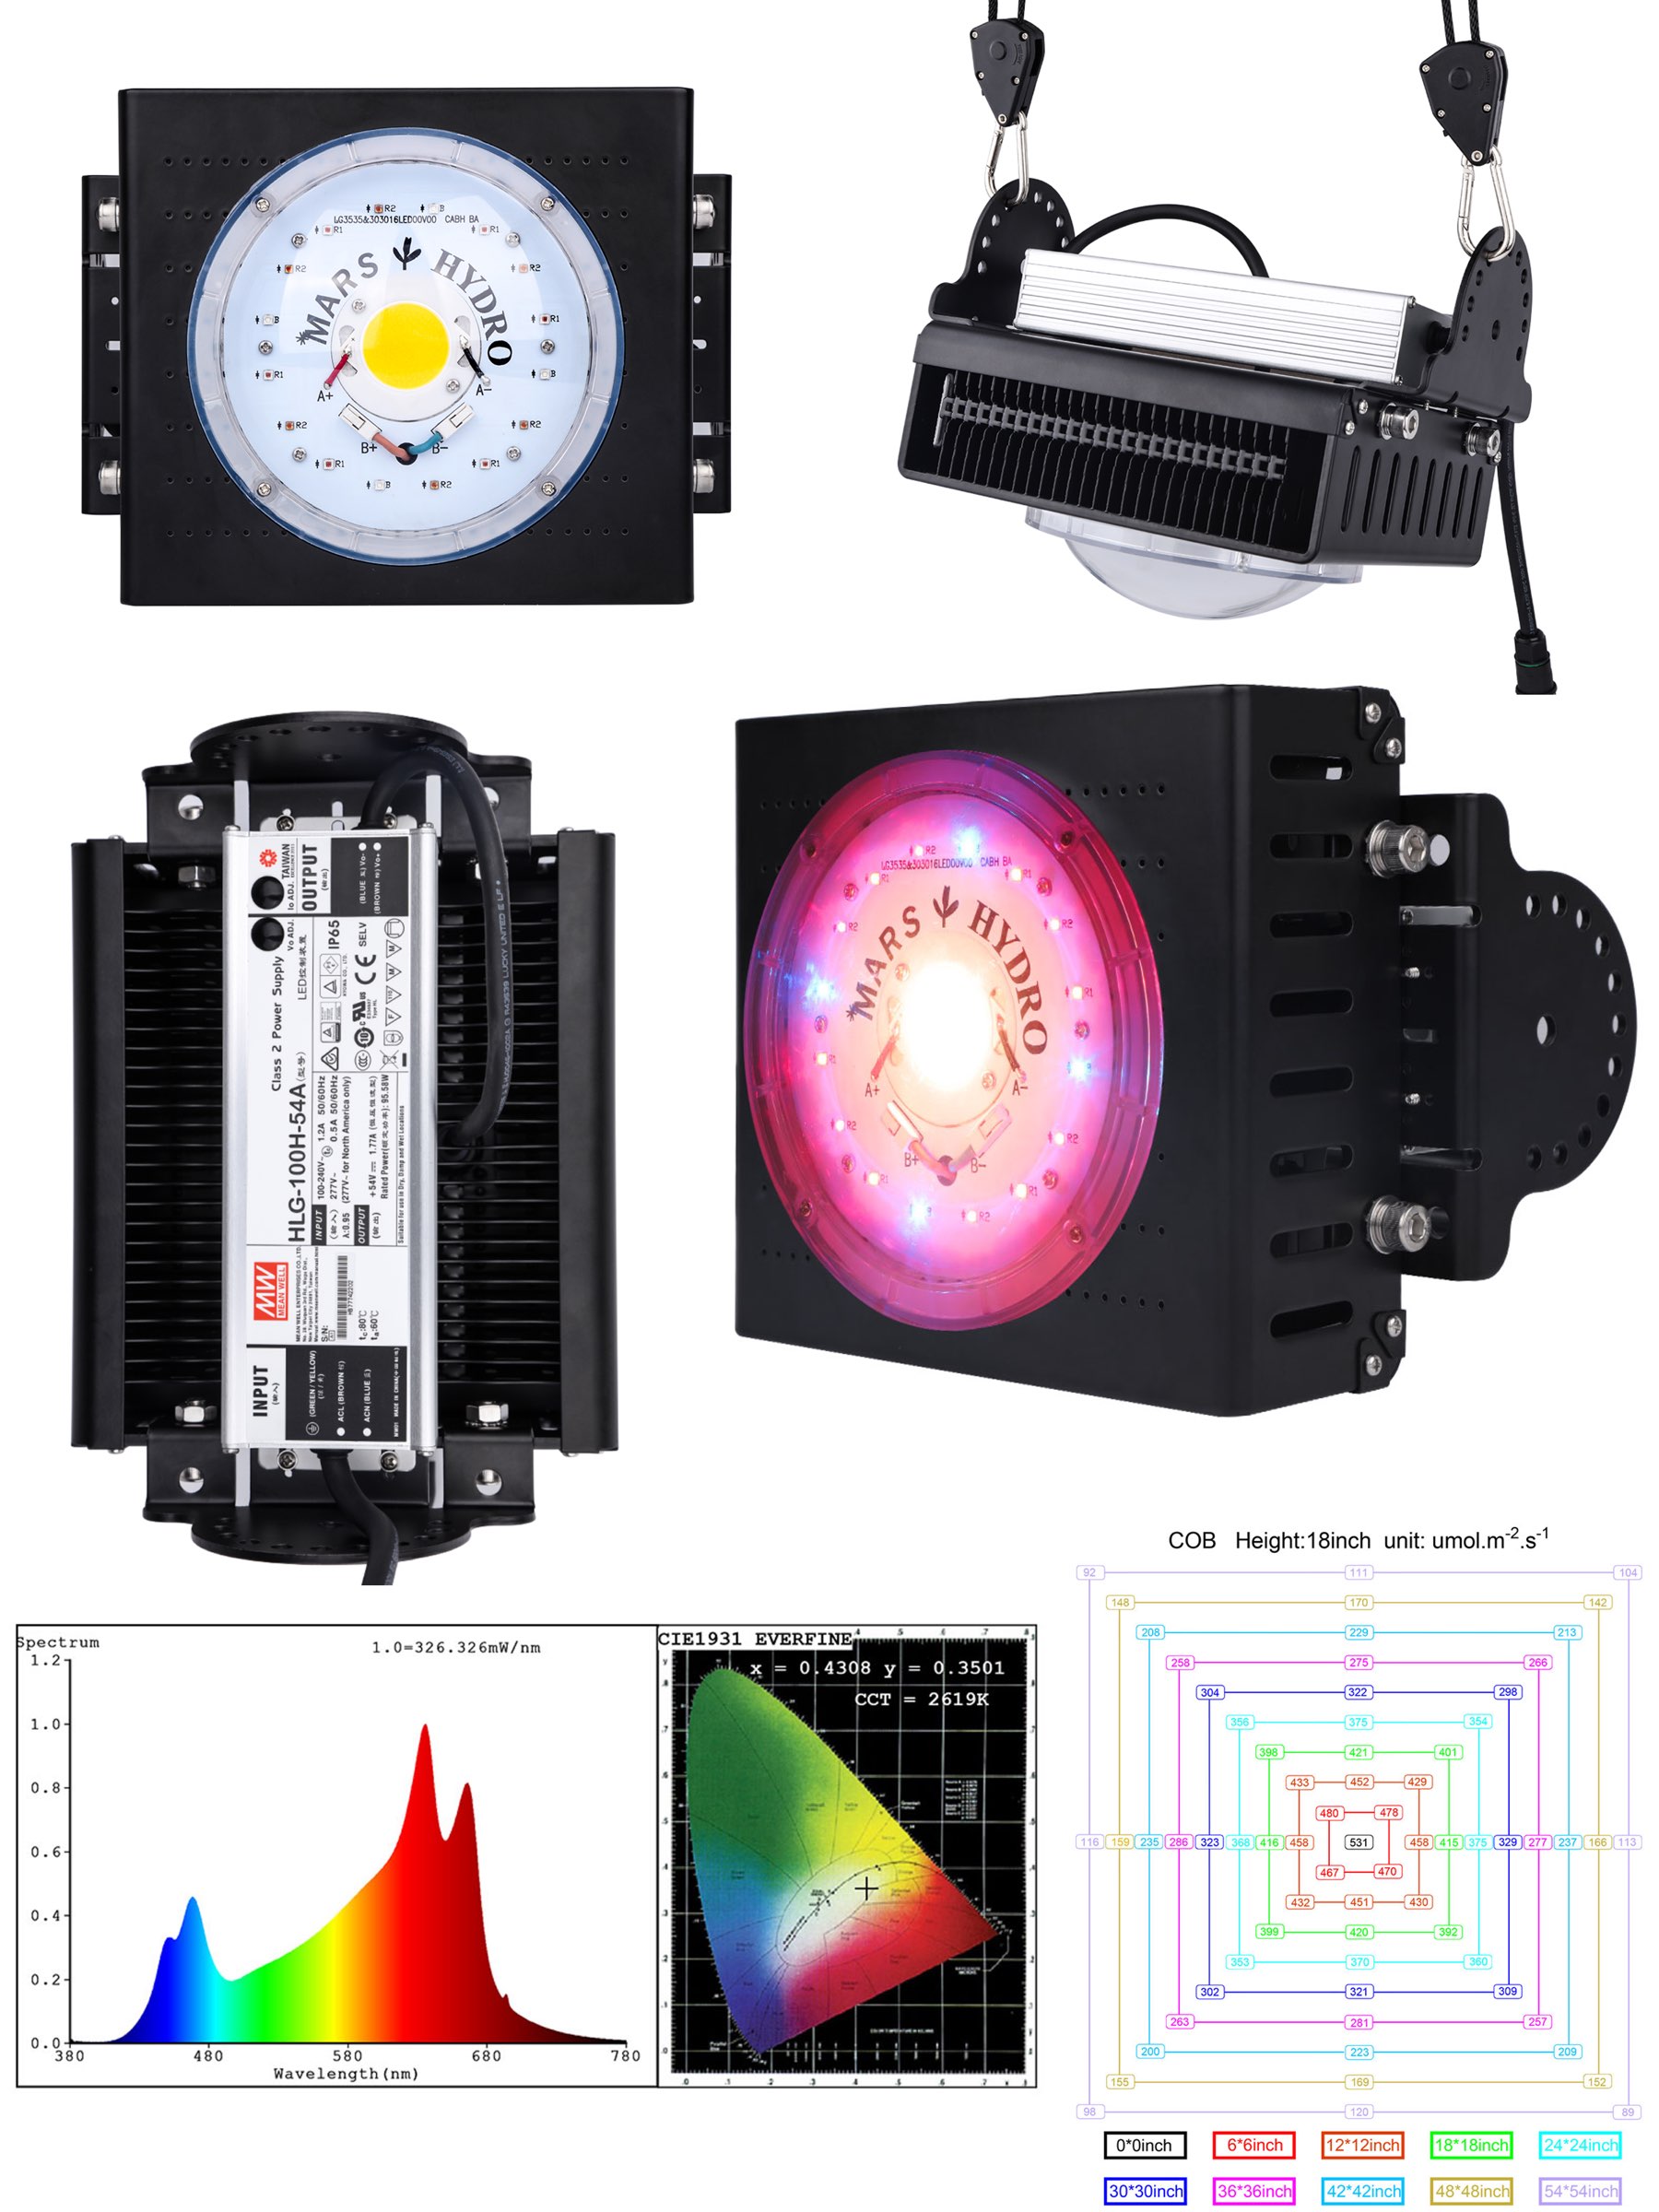
— MarsHydro COB Led-growlight – www.mars-hydro.com. COB stands for Chip-On-Board, the latest all-in-one technology in lighting the indoor marijuana crops.Read more about fancy new technology – the COB – by this link: COB LED LIGHT — ILLUSTRATED
How Far From The Plants Do The LED Lights For Growing Need To Be?
One of the things to watch out for when using LED grow lights is that they must be placed at a greater distance from the plants than traditional CFL lighting, and this means that you need sufficient height in your growing space. LED grow lights must be kept at least 30cm to 45cm away from the top of the plants – a big different when compared to the few inches which is suitable for CFL lights.
Many LED lights come with manufacturer’s guidelines as to where to the height at which to place the lights above the plants, however many growers produce good results by starting higher and then moving lower towards the tops of the plants as they grow. When using 400W or 600W LEDs, some manufacturer’s recommend beginning as high as 90cm and then gradually lowering their height to around 18” over the course of two weeks. Although lights vary between manufacturers, a general guide to the correct height for LEDs is as follows:
Seeding
24” (60 cm)
Germination
24” to 30” (from 60 cm to 75 cm)
Vegetative Stage
18” to 24” (from 45 cm to 60 cm)
Flowering
12” to 18” (30 cm to 45 cm)
How To Use Your LED Lights For Growing
When choosing LED grow lights, often you will find that you achieve a better result when using several small panels rather than a couple of larger ones. For example, two 125W LEDs (with a total of 250W) often produces a better result than a single 250W model and this is because it is easier to spread the light around to the most needed spots with more panels.
LED lights for growing with a 3W chipset are generally the most effective at producing a larger yield and are unlikely to burn the tips of the plants. Overall, you should aim for 50W to 60W per square foot of growing space when buying LED panels to get the best result.
Avoiding Common LED Grow Light Problems
Although LED lights for growing produce great results, they can be tricky to get to grips with since they grow plants in a different way to other types of grow lights.

One of the main problems is that if the lights are placed to close to the top of the plants, they can cause the leaves to become discolored, in the same way as a nutrient deficiency woord, even if you know the nutrient levels are ok. This is an especially common situation during the budding/flowering phase, particular toward the end of the flowering phase. The tops of the buds may also bleach due to excessive light, so it’s important, therefore, to keep the lights a minimum of 30cm to 45cm inches from the tops of the plants to guard against this light burn problem. You will be able to tell if your plants are suffering from light burn as opposed to nutrient deficiency because the lower leaves will look healthy and green while the top ones look discolored.
Another thing to watch out for is the possibility of accidentally over-watering your plants. This often happens when switching from more traditional grow lights which produce a lot of heat since plants grown in hot environments need a lot of water. As LEDs produce considerably less heat, less water will be required and giving your plants too much can result in damage. The roots of your plants will need oxygenation in order to grow quickly, and over watering will reduce this process, thus reducing yield and plant growth.
Since LEDs produce less heat than traditional grow lights, you may also need to think about investing in a heater for your growing space, especially if you live in a colder environment. You may have been used to your traditional lighting providing sufficient heat for your plants to grow, but without this added warmth, your plants may fail to flourish unless you add an additional heat source.
LED grow lights are a costly investment, so you need to make sure that you take good care of them. While the money that you spend on this light type offsets the expenses of other types of lights such as venting systems, air conditions, reflectors and ballasts, not to mention the excessive electricity consumption, you could find that your LED lights for growing can be damage if a lot of high wattage devices have been connected to the circuit as this can result in voltage fluctuations which may damage the power drivers in the lights which provide power for the diodes. This is especially important to note if you are powering your grow space with solar energy, since this type of system is prone to power surges and spikes. The best way to take care of your LED lights for growing is to buy a power stabilizer which can regulate the voltage being emitted from the power box, eliminating the power fluctuations which could damage your device.
One further problem to look out for is a possible magnesium and calcium deficiency in your plants. This is again because of the lower heat levels that LED lights produce. Since the plant leaves will transpire less moisture then when grown under an HPS system, this means that the magnesium and calcium ions will be less mobile, thus causing deficiencies that will need to be correct with extra nutrients. Although this is a simple problem to rectify, it’s important to be aware that it could occur, since the soil will already contain the right level of magnesium and calcium. The good news is that supplemental magnesium and calcium nutrients can easily be bought in grow shops and will solve this issue quickly and easily.
The Advantages of LED Lights
One of the greatest advantages of switching to an LED grow light system is that they can hugely save on electricity. As an energy efficient form of lighting, LEDs can cut your bills dramatically since they use up to 60% less electricity than more traditional forms of grow lights. Another advantage of LED grow lights is that they reduce your growing footprint, especially when compared with running HPS systems which draw a lot of energy.
For even greater convenience, LED grow lights provide full spectrum light wavelengths, and that means that there isn’t any need to switch your bulbs for the flowering and vegetative stages, since one set will work for both phases of your plants’ growth. Since LEDs also produce up to 80% less heat, it is much easier to climate control and vent the growing area, and much cheaper too, especially if you’ve been using an air conditioner to keep the space at an appropriate temperature.
One further advantage is that LEDs contain UV light for less fungus, mold and pests, and as they have a lifespan of up to 50,000 hours, you won’t need to replace them very often. Yes, they may be expensive as an initial outlay, but they recoup the expensive in around four to five growing cycles.
As LED grow lights produce considerably less heat than traditional lighting types, there is no need to water your plants as often since evaporation will be reduced. You’ll also need to add fewer nutrients since the plants will use up their food less quickly due to reduced heat and reduced water. This means you’ll have much less maintenance to worry about, less chance of unwanted nutrient build up in your growing medium and also less risk of accidentally over-fertilizing. Not to mention the cost savings that you’ll enjoy too!
LED grow lights are also known for producing a better aroma and taste than other types of grow lights since the lower temperatures in the growing space allows more flavonoids and terpenes to stay inside the plant tissues instead of being lost into the atmosphere. This means that there will be a less strong smell in your growing area and a more tasty and flavorful bud.
Since LED grow lights are conveniently and much smaller than bulky HPS lights, they will take up a lot less room in your growing space. This means that you can use a small grow tent for a more discreet approach, or grow more plants in your available space than you would have been able to with larger lights.
With the advantages of switching to LED grow lights becoming clear , it’s easy to see why they have become so popular with growers over the last few years. Modern LEDs are powerful yet efficient and are also cheaper to run compared to older style lighting systems, and since they run cooler they are a much more convenient solution to growing at home.
As they are optimized to the plant light spectrum, they provide a customized approach to growing that doesn’t waste energy and yet produces an impressive yield and product. As time goes on, it’s likely that even more people switch to this style of grow light as their benefits are fully realized.
COB LED Light — Illustrated
Sat, 04/Aug/18
The latest technology in LED-lightning is COB, Chip-on-board LED light. Full of benefits, except the price, it fits much better into a smaller growing space: a closet or a tent; it emits narrower beam resulting more light onto area (read: more herbs!!). Economic, powerful, beautiful and expensive.
COB (short from Chip-on-Board), is a LED packaging technology that suggests mounting multiple LED chips directly onto a supporting ceramic surface to form a single module, known as COB LED chip. These multiple LEDs tiny in size, wired and packaged together they appear like a bright solid panel and function as a powerful light source:
Image Source — Chip-On-Board COB LED Module
The SMD comparable to classic LED “replaces” those long leads of each diode (known as the cathode and the anode) shrinking a total light unit in size significantly. And COB replaces the full circuit making it one ‘solid’ piece. COB even more decrease the size of a unit, offering more ‘led-lights’ per area, therefore more light is emitted, more dense, and less loss in power due to integrity of the piece. The surface where they fixed to is now called the ‘substrate’.
COD and SMD illustrated
First of all imagine an old-school LED = Light Emitting Diode. For example ones shown on the image below form a LED-light. This technology is already an ancient history of LED lights:
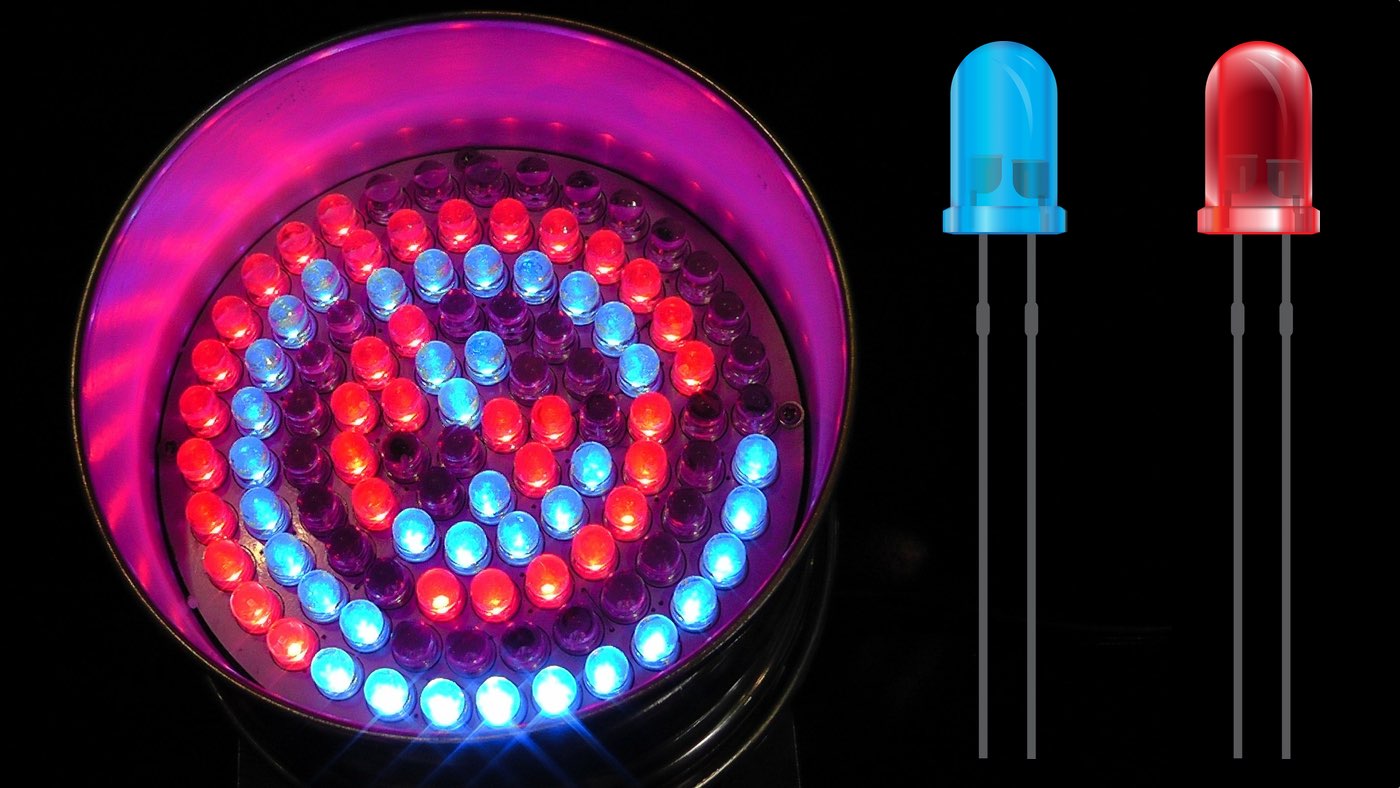
This is a simple traditional LED, already the Past.
Then comes SMD = Surface Mounted Diodes, sometimes referred as Surface-mounted devices… I don’t know which is correct, it appears like both exist. Anyhow, this is the Surface-mount technology, and it suggests when a small ceramic panel consists of a number of small diodes mounted onto this surface/panel one-to-each other very closely. A group of such ‘surfaces’ (the SMD chips) then form a LED-light (see the image below). Comparing to classic old-school LED, this SMD provides higher reliability, smaller size, and a neat and cute look too:
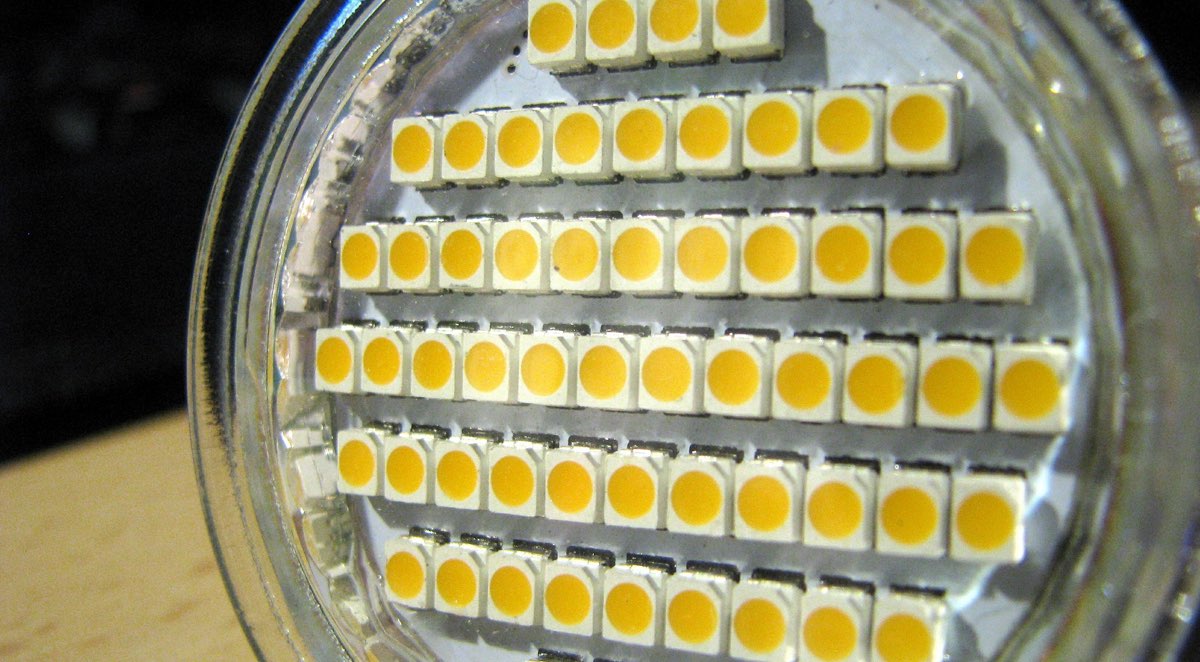
This is SMD LED chips, the most popular LED Light technology nowadays.
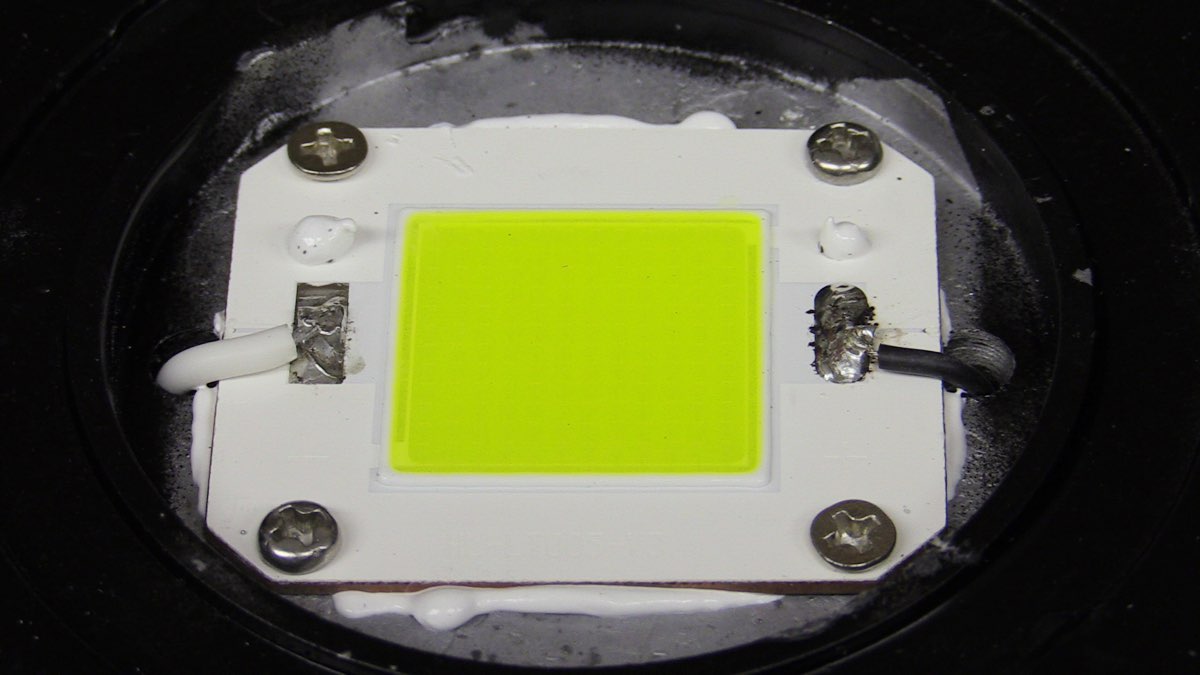
COB = Chip on Board, is the next great step in LED light development, when they place all into one panel (typically 9 or more chips) and it gives more light, significantly less package size, and even greater performance in terms of amount of light. Looks like a small solid panel of light:
— the Chip on board is the growlight latest technology, increasing density of diodes (again) increases the overall efficiency (again), saves space in the green-house and offers more light from the same area
— The COB LED Chip on a COB LED Grow Light! The yellow spot in the middle is the chip, the substrate where to the diodes attached closely to each other altogether to form the LED-light. Fancy, technological, innovative. This is the Mars-hydro’s COB model on the shot above.[/caption]
What else?
The COB LED package appears more like a solid lighting panel rather than multiple individual lights, comparing to the traditional SMD LEDs mounted closely together. See the images above for both.
COD is more expensive in general than a regular SMD. Roughly $300 against $200. This is simply because it is a fancy-new technology, but then think that it’s always worthy to invest into self.
Smaller space required to place COB light unit. No more headache about how to fix an extra electric box of lights over the plants inside your small green-house (whether it is a closet or a grow-tent or whatever indoor growing space). One small COB led-light now shall give you all the same amount of light.
COB led-light is simply convenient, and we at times pay for the convenience too. Think about, that applying to a new technological thing will give an extra knowledge about the technology in general. Isn’t it fun by itself? Some day the COB lights shall finally replace SMDs which are ‘regular’ now, and by that point you already know everything about it in practice. Sounds cool?
No noise. COBs are fanless.
COB LED Grow Light 100w
Mars CX3590 CREE
Fanless No Noise
Read user reviews by this link
- Coverage: 5’x2.5’/ one light ,5’x5’/ 4pcs light
- Max Yield: 2.0g/watt
- Replace HID/MH: 150W
- Draw Power: 110V/110W±5% / 220V/108W±5%